Tuesday, April 23, 2013

AX relay success!

ZOMG YAY!   I finally fixed the AX Relay!  Now, while this is awesome, that just puts us back to "motor spins endlessly" and the reset never completing.  But oh I was so happy to hear that motor start spinning again, knowing I had been able to undo the damage I had previously wrought.
I am away for a bit, but when I get back I will start investigating the startup issue anew, focusing on everything else that is NOT that AX/BX relays, and see where I get.

But on to the AX Relay.  Take notes, you will need this info.
So the first thing that goes  through my mind is to look for things in their powered-off state.  The switch is not activated while the score motor was running endlessly, and so the error should be in how the switch sits in it's non-activated state.  There could be issues with the settings while "activated", but that's not effecting us at this point since we never get to that part of the cycle.

A bit of terminology:  
Apparently switches that are open while the relay is off are called NO, for Normally Open.  If the switch is closed while the relay is off, that's NC, Normally Closed.

what, you gotta problem with lil ol' me???
Take a look at the right-most switch.  It is a NC, normally closed switch.  Looks pretty darn good, making some fine contact.  As it turns out, it was the culprit.


THE CHOPSTICK TECHNIQUE
On some random pinball forum I remember someone mentioning using a wooden chopstick to troubleshoot the relays.  I had forgotten about this, since I now have a switch-adjustment tool.  Why would I use anything so clumsy to bend the blades?
What they didn't say is that the wooden chopstick is for when the machine is ON.  While powered up, delicately make sure the NO switches are truly open, and the NC switches are truly closed.   Trusty chopstick in hand, I made the tiniest of pokes to that right switch and CHA-CHUNK the motor begin endlessly spinning once more!

Now that I had found the culprit, I had to put together a fix.  I latched the switch, thus opening that NC switch.  This gives ample space to bend the stationary blade towards the receiving blade, making sure that the resulting open gap is respected.
Always good to remember:  Always tighten switch stacks FIRST, the screw closest to the blades first, and then the 2nd one.
Thinking that there might be residue blocking a solid connection (because hey, they are TOUCHING, but perhaps not touching well enough...) I got out some 400-grit sandpaper, cut a tiny bit, folded it over, and rubbed it between the contacts while the switch was open.
I had bought some Flexstone files, as they seem to be the most recommended things for cleaning contacts, but for AX/BX relays I argue that they are way too thick for the delicate touch that is required.

Pinball Wizardry, here I come!

scans of the 1976 Gottlieb Royal Flush manual + schematics

Borrowed a scanner and digitized the 1976 Gottlieb Royal Flush manual + schematics. The schematics I had to piece together from about 11 separate scans, but it came out OK. I haven't cleaned any of this up, so you will view it warts and all.
I figure even if people don't have this game, they might be interested in checking them out.

Manual is individual JPEGs in a ZIP file.
The schematics JPEG is 5 MB in size.
The schematics PDF is 150 MB in size. If I eventually clean it up, it will get a lot smaller, but I don't have the time, currently.

Enjoy!

http://thetastates.com/pinball/RFmanual.zip
http://thetastates.com/pinball/RFschematics.jpg
http://thetastates.com/pinball/RFschematics.pdf

Friday, April 19, 2013

uh oh

Good news! I got myself a switch adjustment tool, and some Flexstone files!
Bad news:  BUZZZZZZZZZ.

That is the sound the motor makes as it has stopped spinning since I've obviously done something bad to the AX relay.  I have heard this sound before.  Once I turned the machine on with the AX relay in on position, and it just sat like this.
But now here I am with the AX in my hand, all sketchy contacts looking amazing and the gapping looking great, and NOW it does this to me? 

My mind races:  Did I touch anything else?  Nope, I don't think so...  but the switch, it looks great!  Ahhh I guess this is what all that talk of "you just have to be experienced to adjust them" meant.  Ah phooey.

So now I want to adjust the AX to get back to motor movement, let alone getting back in to debugging the reset cycle.

FAIL.  I'm sleepy, I'll look at it more tomorrow.

Thursday, April 18, 2013

the credit unit

While I was in the back box tonight I took a look at the credit unit, since one repair I read about discussed bending it to be on Free Play.

Bottom left solenoid (the baby blue thing!) adds a credit.  The upper left one subtracts a credit.  When the cogged wheel (center right) gets down to zero credits, that solenoid stops having an effect, it is mechanically moved off at that point thanks to the rod sticking out of the brown plate.

Here is the machine with one credit in it.  Middle and right switches are closed.  I have no idea what that left-most switch does.  Perhaps it marks the credit maximum?  Seems logical...

And here is the machine with one credit.  The cogged wheel has advanced one, and the pole has hit the switch and opened those two.

I am unsure if you have to bend both of those, but really if you're going to start mucking up your machine you are probably best to consult an actualy reference and not some blog entitled PINBALL NOVICE.  So be warned.
But if they are bent for free play, one cool thing to note about this position is that a successful start-button press will activate the solenoid, but since it is mechanically disabled from the plate the pole will stay in that zeroed position.   That is opposed to, say, ramming it's way through the switches leaving carnage in its path.

back in to the machine... but still no luck

My pinball machine has been out of commission for a while and I'm really hoping to get back to playing it.  I have some tools + supplies on order, but acquired a few things locally.  I want to get back to ending my evening with a few games, instead of being bewildered why it can't reset properly!

I've been reading websites about repair, and while there hasn't been much specific description of my issue (motor keeps turning indefinitely, reset never finishing,) the type of behaviour is described as somewhat common.  Most sites suggest a comprehensive look at all the major troublespots to get a machine in running condition again, so that is how I took my approach as well.

We start in the backbox, and the player unit:

ooo I think we've seen you before!
I got 400-grit sandpaper (available at the paint section of your hardware store) and buffed the brass rivets after cleaning them with rubbing alcohol.  (Teflon lube on the way)
One thing to note about this wheel is how the connections are done.  The spring-loaded contacts rotate around, but each contact is wired to another, so all this is doing is closing circuits in a cycle. One brass rivet gets connected to another.
I noticed 2 spring connecters where very stiff in their holder so I dabbed a tiny amount of 3-in-1 lube in to the container to help their up-down motion.  Not sure if this was really necessary, because they don't "travel" much.  They are either on the bakelight plastic backing, or on the rivet.  That's their whole range.


A big part of the reset cycle is the scoring resets.  There are 4-players in Royal Flush, and each score reel has to get down to 00,000.  Each player's score has 4 reels.  (the lowest points are 10, so the rightmost significant digit is just fixed at zero)
Go down a few posts on this blog to the steps for a reset, and you'll see how the score is a big part of the reset cycle.  Here are the pertinent bits:
5. When 'AX' relay actuates, the reset relays 'Z1' and 'Z2' are energized in sequence by rivets on the 'Player' unit, through switches on 'AX' relay.
5a. Motor 1A steps the 'Player' unit, through switches on 'AX' relay and 'P5B', to the 20th position energizing 'Z1'.
5b. When 'Z1' is energized the 1st and 2nd player score units reset to zero through switches on motor 1A, motor 4A and 'Z1'. When all score units of the 1st and 2nd player are at zero the player unit steps to the 21st position through a normally closed switch on 'Z2' and normally closed switches on all score units of the 1st two players, actuating 'Z2' relay. The 3rd and 4th player score units now reset through switches on motor 1A, motor 4A, and 'Z2'. The player unit continues to its zero position through the closed switches on 'Z1', 'Z2', 'P5B' and motor 1A until 'P5B' opens.
6. When 'P5A' on the player unit closes, 'AX' and 'BX' relays reset through motor 2C and switches on 'U', 'O', and 'R' relays. The reset cycle is now complete.
One odd thing:  I can manually advance the score reels, and manually advance the player unit one (so it's out of it's zero position with P5,) and then I turn it on and the score resets and the player unit resets.  But no change on the AX relay.  The startup sequence here SUGGESTS that AX needs to be activated for that recycle part to occur, but I guess not.

How do you step these motors?  As a novice here it took watching pros do it nonchalantly in youtube videos before ever attempting it myself.  But you push the solenoid down through it's motion using your finger.  That's it.  The rest of the mechanics click forward one step.   The score reel solenoids were tough to reach, so be careful.  Don't want to bust up any wires or misalign something while in there!

So the scores are reseting and the player unit is seemingly getting to the home position.  Just to be sure, I wanted to check the "zero position" of all the scoring reels.
Behind each reel we have a small bank of switches. (4 reels, 4 players, =16 banks total to inspect.  x2=32, since there are top + bottom switches.)

For most of the switches (the 10s, 100s, 1000s,) there are 3 states:

This is the "zero state".  Left switch closed, middle switch open, right switch super open.  This means reel is showing 0.

This state is for 1 through 8.  I am not sure if it is the left or middle that counts as the "zero switch", since some stuff is indicated via being closed, some open.  But when not-zero, the left one is open, middle is closed.  Right is still open.

This is the special "9" position.  Left is still open, middle still closed, but right-most is now closed.  My assumption is that when reel goes forward to zero (score roll-over) the open of this switch triggers the subsequent digit to advance.  The 10,000 digits do not have this as the game rolls over uneventfully after 99,990.  Some EM games have a light that goes on at this kind of rollover, but not this game.


All of the switches seemed clean and with great gapping!   On inspection I jumped at one moment because I found a DEAD FLY resting on one of the switches.    Imagine that, going switch to switch, scrutinizing each, then suddenly BOOM, dead insect in your center of vision.  It must have gotten in there last summer at the last owner's place, since we haven't had flies in many many months.

so if all of the zero switches are seemingly hunky-dory, it seems like the issue would be with whatever was RECEIVING that "hey we are all at zero" signal.
See step 6 above:  When P5A closes, and motor spins and hits 1A (which of course it does since it's spinning nonstop,) this is supposed to reset the AX and BX relays. 

Oh boy, AX and BX relays!  The dreaded AX and BX relays!  The oh so finicky AX  and BX relays!  Yes, I've read much about them as of late.  :)
They are "latched" relays, meaning that when turned on they get latched in that position, which I suppose is good so that a relay isn't constantly active?  But apparently due to this (in part?  or wholly?) the switches have limited "Travel"...  that is, the range of movement is pretty darn short, so everything has to be much much much more precise in its alignment.

oh the glory
Sadly for myself, I also frequently read about how they are very difficult for a novice to adjust and its only through much experience that you can make a big difference on them.  Well OK Captain Discouragement!  (aka everyone on the internet who knows what they're talking about...)

The plates all seem to be in the right slots.  There seems to be clearance in all the right positions...  I did some cleaning with the 400-grit paper (flexstone files have yet to arrive, but more on them when they do) and some minor adjusting via a wooden chopstick.  Got that tip from a forum, but only tried minor things as I have a proper switch tool coming for the weekend.

Put everything back and....  NOTHING.  Well, at least nothing new.   Same old spinning motor.
I still think the problem is the AX and/or BX relays, but I will have to approach them in a more measured (and well equipped) fashion this weekend. 
I will also spend some time with the schematics and see if I can trace where I am at least.


Oh wait, aren't those relays kind of cramped in the box?  YES.  And for the longest time I had no real idea how to get them out.  I saw the pin on the back, but, surely, THAT couldn't be the only way they are affixed... could it? 
Yes indeed, the relays are held on via a metal cotter pin.  Here is a shot of another relay, as it was easier to photograph...


Use some needle-nose pliers, lift up, and you can slide the relay off.  I don't have a lot of confidence is 37 year-old wiring, so I am very careful with holding it, trying my best to avoid any pressure on the wires affixing it to the game.

Sunday, April 14, 2013

videos

I wanted to take a moment to point to some of my favourite pinball resources online.

First up, the videos.  Far before I ever had a machine, the videos were there, calling out, enticing, keeping oneself occupied late Saturday evenings when one should really be asleep...

The most important is the PAPA Youtube Channel, wherein you can watch the world's best performing in tournament play, with incredible commentary.  My only critique is that they should put a PZM mic on the machine and include the machine noise higher in the mix, and have it pushed down by commentary only.  PAPA people, you listening?  Email me for technical details, let's do this...

Here is the finals match for Pinburgh 2012:


Pinball.org has an amazing list of pinball tutorial videos, that take you through the ruleset of many popular machines.  This list here has the tutorials but also gameplay videos.

CGR pinball is a youtube channel with some great tutorials.  Some linked above, but this is a youtube channel so easy to subscribe.  some of the older videos use this amazing 3-camera screen, which I LOVE, and lament the abandonment of.  But, enjoy a few great tutorials that utilize it, including the 3-part Addams Family one...


Now we enter the realm of PINBALL REPAIR.  Oh yes, you were watching pinball wizards do their thing, you were watching pinball reviews and fantasizing about which ones you'd purchase with a lottery win, but here's the real meat of it:  fixing the actual pinball you have.  

This channel belongs to one Clay Harrel, aka the Pinball Ninja.  He may be the best pinball repair specialist in the world.  If not the best, then certainly the most useful.  It was his quest to fix 500 machines in 365 days that got me back in to pinball.   Now his repair blog is nearing 800 fixes, and is on a private site, accessible via $20 donation.  (a total value)  more on that later, but his video channel features some indispensable knowledge.
Absorb:


Finally, I have such a nerd-crush on Jeri Ellsworth, whose channel is brimming with electronic tampering, much of it related to pinball.

Here she is dropping some EM science:

Tuesday, April 9, 2013

wherein I make things spin and go clack

So let's continue on the critical issue I was describing last time.
A friend said his Gottlieb Pioneer machine was also doing the same thing, and after going in to the player reel and tightening some screws his was working.
Oh, hopefully mine will be just as easy, right?  Right?  :)

What's the player reel anyways?  I had just been looking at this thing:


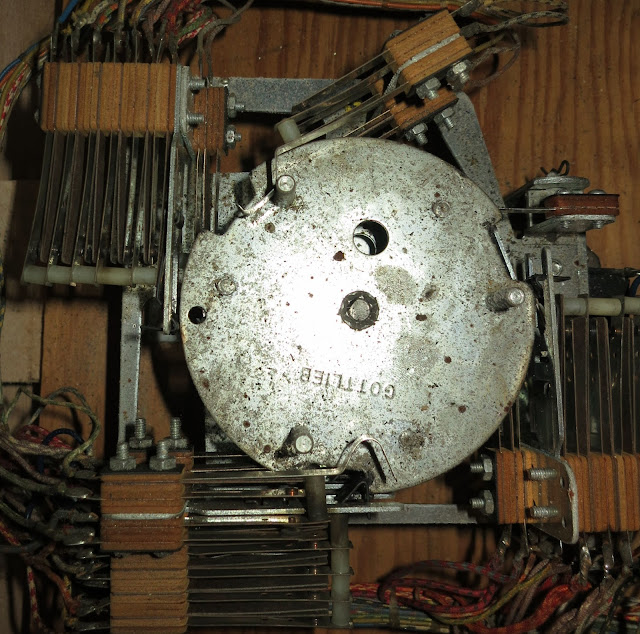
Why?  Because it was the only thing doing any thing.  This is the MOTOR.  Let's take note of it for a bit because it's a fine piece of engineering.


note the 3 layers of switches.  We are looking at switch bank #1
The top is marked D on the diagram below, it's the pole that clicks by.
Below that is disc C, and has indents in it that trigger a change as the pit goes by.
The bototm one is disc A and has multiple teeth for triggering.

This gives a good shot of the pole about to be triggering.  In the centre you can see the pit about to be hit by the switches on the left.


The motor turns.  The notches on the metal plates activate the banks of switches surrounding it.

Here are notes from the machine schematics, and as you can see it's rotation is a somewhat intricate dance of switch-triggering through a full cycle.
Each level of plates on the motor has a different frequency for the switches, and we can see just how many wires exist from each switch, making each pulsed step a bit complex.


These 2 charts are confusing!  the key is to not correlation them specifically, as in 1B on the top chart is NOT 1B on the bottom chart.
TOP CHART: switch bank # vs what labeled part of the gear assembly is thwacking it.  Where they intersect, those are the switches being hit
BOTTOM CHART:  shows the timing of the interaction. So Motor 3D is when motor 3 is acted upon by plate D.  And for some reason that triggers switch 1B.  Which is different than the Motor 1B interaction!


Now, to the backbox!  Ahh the player reel.  This thing:


I barely looked at it before.  I am not sure if this outer back plate has rotation independent of the center column.  But the back rotates and connects with the metal switches during it's trip, triggering another set of switches.


Here we can see the contacts that spin around.  I wonder if these will need cleaning?


I was told this latches down if I remove the upper screw and HOLY SHIT, the darn thing just falls outward on a hinge.  Brilliant.


Inside, we see the cogged wheels and their rotation also pulses the switches.  The nodules on the hard plastic spinners are all offset so only a single switch bank fires at once.

the cogs look a touch dirty, but that's what happens when you build machines with white parts.  At the bottom you can see the teeth-dense black cog for stepping through the motions.


I checked for loose screws on the switch banks and only found 2 that weren't perfectly tight, but those only allowed a quarter twist before being snug.
I noted a contact in the switch relay had some darkish guck on it.  I got out my dental tools and gently scraped that away.  Then I thought, "hmmm, I hope that's residue and not actually some sort of conductive lubricant that's supposed to be there!"   That's the risk of working on ANYTHING where you don't know the way it's actually SUPPOSED to be .

Here we see the stacks of switches on the left.  As the nubs come round, they will get triggered in order, top to bottom, thanks to the offset of the white nubs.

On the left are the screws I tried tightening.  Not much to do there


I also manually pushed down this solenoid and made it all step forward once, thinking it might be stuck on a final gear or something.
We can see how this solenoid works here:

the solenoid is on the bottom left.  When activated, the piston to it's right pulls in towards it.  It pulls the rod down, which as we can see had a pivot point, so on the other side the rod goes up.

We're looking at the other side here.  See the rod with the spring attached?  That's the other side, so that rod is going to go "up", aka to the left of this picture.  That also pulls that centre rod to the left, which allows the black cog to chunk forward one step.


One solenoid pulse, one step in the machine progress.  20 pulses or so, we can get through the full cycle.


I swung the unit back up, attached the screw and pressed the power switch, hoping for full resolution and a happy game of Royal Flush.
CLICK-CLACK-CLICK!  Sounds!  The player unit ran through it's initialization again with noisy gusto (thanks to the backbox cover being off still,) but after that was over I was back to the pulsing playfield lights and spinning motor.

So the next step:  Find out how the player reels communicates the "Hey I'm done zeroing everything up here!" signal to the next relay (whichever that one is...) and see if I can check through those.


That video video I posted last time, of that other Royal Flush owner's issue?  The one where I was all "this is a different problem, since he has relays firing"?  Well that was just 1 of 4 videos they posted.  They did have a video where it was the exact same as I'm having now.
And in watching his video, I discovered that on power on I DID HAVE SOME RELAY ACTION!  Three relays, Q+U+H, were engaging in his, and I confirmed the same in mine.
I googled his vid links and found them linked in a forum.
He seems to have received some sage advice there, but alas much of what I read is far too advanced for my current confidence.  Someone said "Just poke the AX relays with a chopstick, it's finnicky" but, as above, when you don't know how it's SUPPOSED to be, best to apprehensive about just going poke poke poke.

Saturday, April 6, 2013

Critical issue: initialization problem

Popped in a quarter last night and uh oh, things just kept on grinding, the lights on the drop targets kept going on-and-off, and the ball never popped out.  The machine was stuck in its initialization loop!

This is the first critical issue.  That is, the first issue that totally impedes regular play.

Open it up inside, and here is the score counter unit continuing endlessly:

Each cycle, some lights on the playfield go off and on as well.  Here's a nicer photo of the scoring unit.   Or at least what I assume is the score unit.  :)


I already placed an order for a repair guide from The Pinball Resource, but that won't arrive for a while.

I found this great page that describes the initialization routine for Royal Flush.

Here it is, copy-and-pasted:
1. Inserting a coin or pushing the replay button actuates 'S' relay (Start relay).
2. This relay will lock-in through its own switch and a motor 2B switch.
3. 'S' relay starts the motor running.
4. 'AX' relay actuates and the 'coin' unit resets through switches on 'U' and 'S' relays and a switch on motor 1D. 'Q' and 'U' relays de-energize when 'AX' relay operates.
5. When 'AX' relay actuates, the reset relays 'Z1' and 'Z2' are energized in sequence by rivets on the 'Player' unit, through switches on 'AX' relay.
5a. Motor 1A steps the 'Player' unit, through switches on 'AX' relay and 'P5B', to the 20th position energizing 'Z1'.
5b. When 'Z1' is energized the 1st and 2nd player score units reset to zero through switches on motor 1A, motor 4A and 'Z1'. When all score units of the 1st and 2nd player are at zero the player unit steps to the 21st position through a normally closed switch on 'Z2' and normally closed switches on all score units of the 1st two players, actuating 'Z2' relay. The 3rd and 4th player score units now reset through switches on motor 1A, motor 4A, and 'Z2'. The player unit continues to its zero position through the closed switches on 'Z1', 'Z2', 'P5B' and motor 1A until 'P5B' opens.
6. When 'P5A' on the player unit closes, 'AX' and 'BX' relays reset through motor 2C and switches on 'U', 'O', and 'R' relays. The reset cycle is now complete.
7. Inserting additional coins or pushing the replay button will step the 'coin' unit to a maximum of 3 (4 players) through switches on 'U' and 'S' relays and a switch on motor 1D. The replay button circuit opens when 'coin' unit is on 3rd position.
8. Place the ball in the out hole. The ball return switch closes and completes the circuit to 'O' relay through the normally closed switches on 'A', 'AX', and 'Q' relays. 'O' relay locks-in through its own switch and a switch on motor 2B. When 'O' relay is energized, motor 4C actuates the ball return coil (which kicks the ball onto the runway) through a switch on 'O' and a normally closed switch on 'BX' relay. The ball is now on the runway and is ready to be put into play.
9. The remaining balls that enter the outhole are kicked across the trough switch which pulls in 'P' relay. 'P' relay runs the motor. Switches on 'U', motor 2C, 'P', 'BX', and motor 1A advances the 'Player' unit the required number of steps determined by the 'Player' unit switches and the 'Coin' unit.
What's all that gobbledygook?  Well if you remember from the brief look inside, each relay is clearly marked.  Let's take a better look.


In my video I take a quick peak at the relays and check for action.  Why?  Because I found this video on youtube where someone was having a  similar problem, but you could see movement on the their AX relay.
I also checked inside the backbox and nothing was firing in there.

I do not have the skills to diagnose/clean /fix the issue now, but will simmer on it.  I got an email to check the coin slot for a stuck coin, but that was clean, no issue.  That might have been the issue before when I saw it continually add players, but the machine can't get out of the "clearing" mode and on to adding any additional players.

Tuesday, April 2, 2013

documenting the problems

I want to keep good tabs on all of the issues that I find on this machine.  It will give me context for all of my future technical research, and allow me to reference what has increased or been resolved and/or faded away.

Here is a reference pic:


ISSUE #1:  Green joker resets to TRIGGERED
I think this is by far the most pressing issue for me to look in to.  Once in every 3 or 4 resets the green joker will start with already being triggered.   That is, the rollover light is turned off, and the green circle lights are on, as though I had already rolled the ball over that joker up there on the left.
Before the beginning of each ball a reset routine happens on the machine.  All drops are raised, all stored relays are cleared.  All jokers light at the top, and just at the very end of that routine the green joker resets again.

Here is a video of me playing the machine, and you can see this occur at 1:59 in the video below.


ISSUE #2: Q and J (5th from the right, 3rd from the right) get initialized to a down position
This is another rare occurrence, but after the ball initialization routine the drops would duck away to the down position.  Never at the same time, mind you, since it's rare for either of them to have it happen, but something to watch for.


ISSUE #3: Jack occasionally gets stuck halfway down, continuously awards points
When I was about to buy the game this occurred while the seller was playing it, and I went ahead anyways.  The reason for this occurring was pretty easy to diagnose, given the mechanism of the droptarget scoring.  I will go in to further details in a later post.  Since I got it home this has only happened once, and since I did my fix, it hasn't happened since.
But while it was happening, the jack was half-down and would continuously award it's score, for reasons that seem obvious once you look at how it works.


ISSUE #4: motor-engaged hum while ball-return gate open
This occurred in the first 2 days of owning it, and hasn't happened again since, so another to keep an eye on.  When the gate (see below) is trigger to open, it would buzz as though the motor was not disengaging.

 
ISSUE #5:  upon inserting a coin, multiple players are added
Another rare occurrence.  The "add player" routine keeps happening, so adding one credit gives 1, 2, 3, then 4 players and keeps trying to add more, only stopping by turning the power off.


ISSUE #6: left metal rail isn't firmly affixed.
When you shoot up left towards the jokers at the top, you want your ball to roll right up there.  Since the bottom part of this metal rail is not firmly affixed, it acts like a springboard and absorbs the momentum of the ball, sending it right back down.  I think the rail should be flush to the plastic to all for a proper upwards deflection.  This is a common happening, so I should probably deal with this sooner rather than later.  I will seek advice on how best to temper that there metal/mettle.
(see gameplay video above for a few examples of this, say at 3:32)


Monday, April 1, 2013

PRO TIP: Chimes

These are the chimes inside the machine.  They are all of the sound effects. 

xylophone FTW.

When you have the machine open, there is no glass and no playfield to muffle this.  So I'm thinking a piano damper is called for.
Here is your expert pinball tip for extra quiet pinball repair:
booya.


YOU ARE WELCOME.