Showing posts with label Street Fighter 2. Show all posts

Saturday, January 25, 2014

Street Fighter 2: fixing the basics

In a short span there were 2 pieces of important plastic that broke on SF2:
The inner tip of the right flipper button busted off.  It was still kind of stuff in place inside, so I could play it, but the flipper button might fly off if you aren't secureing it.
Then a piece of the shooter rod broke off!  Never expected that.  SF2 has a skill shot that requires precision timing to an audio cue, so you need to be able to rocket off that plunge with an exact amount of force at a precise time.  that means pulling back the plunger and letting it "snap" off of your finger.  I guess the plastic was just aged, and the little snap plunge took a chunk out of it.

ooopsie-doodle.

 Luckily Steve Young has a great stock of Gottlieb System 3 parts available.  (seriously, I'm scared to own a game he doesn't have a massive overstock of parts for)

Rebuilt and ready for action!


New button, new plunger rod, and we are back to 100%!

Tuesday, December 31, 2013

SF2: cleaning under the hood

I had wanted to get deep under SF2 for a while.  The car-crash playfield needed some work, and the subways under the playfield were black with filth.  They are supposed to be translucent.
right subway

left subway and car-crush playfield
First thing I did was the easiest:  completely remove the right subway and clean it, with excellent results:


The car-crush playfield has a few connectors that I labelled and disconnected, then 8 screws to remove it.  Well actually, just 4 screws.  Seems a prior owner had borrowed half the screws for other applications!  Thank goodness I had sought out backups of the exact type in weeks prior.


Here it is on my freezer workbench.


There should be a spring on either side, meaning the car crush was easier due to less resistance.

Both springs re-affixed, everything cleaned, and flipper rubber changed.  Time to re-attached the plastic ceiling plate.
I took the car off for later repairs.  I will see if I can render a new front bumper to it.  As you can see, the red remnants are snapped off and stuck at the front car-crash plate.


Now it was time for the difficult task:  cleaning that left subway!


getting closer...

Taking the car crush off was essential.  I then had to remove the left VUK to get at 3 fastening screws under there.

VUK removed.  Getting closer...
And then...  damn OK this ramp isn't coming off.  Look at the image of the whole under-side playfield.  The wiring harness has securely trapped the winding plastic and even after removing some lights and drop targets, could not find a reasonable way to get the plastic out without detaching the massive wiring harness.  #uggh.

So what to do then?  IMPROVISE!
No way I am letting that filthy ramp survive unattended.

a drain clog cleaner I picked up last week

I then folded paper towels around it, secured with a rubber band, covered in Windex, and then forced down the plastic at the VUK opening.  It would come back filthy each time.  PROGRESS!


It's not perfect, but it is MUCH BETTER.

So. Much. Better.

Right now my big problem with SF2 is getting in to the flippers.  Anyone have any advice for loosing those 2 bolts?  I tried with all of my strength but couldn't get them to budge.

My nemesis.  well, that and my allen key.  You are all my... nemesi?
I have the flipper rebuild kit, but that doesn't help if I can't get in to it!


STREET FIGHTER 2

TODO
install cliffy protectors
get non-ghosting LEDs (and replacing dead bulbs)
clean + adjust the flippers
adjust left extra ball center target
fix car + reattach
deep clean of playfield, removing all plastics + replace upper-playfield rubbers
replace playfield glass

DONE
clean car-crash mech and replace flipper rubber
cleaning the under-playfield troughs
got flipper replacement kit (holding on to it, will use it when needed)
got stargate ramp coils (but not reason to do it yet though)
fix 2 out lights in backbox
secure coin door
solder diode across the right slingshot coil.  Replace Q3 transistor on driver board.
left VUK: new spring, new plunger
get replacement fuses for under the PF
re-secured VUK mounts to provide extra-strong kicks + added extra screws
installed lower playfield rubbers
installed new power module
replaced Q3 transistor to solve right slingshot issue
reattached ground wires
replaced VUK solenoid to correct one
replaced fuse for stargate ramps
reattach tilt mechanism
bend left playfield bracket back in to proper place
new beer seal
Flipper rubber for Chun Li
Replaced flipper rubbers (except car crash flipper)
Cleaned backbox charring + replaced dead + charred lightbulbs
initial basic playfield cleaning 

Saturday, December 21, 2013

learning the ins and outs of LEDs

My order arrived, brimming with LEDs to experiment with!   Rocky & Bullwinkle has some dim lights near the back, so I definitely wanted to give them a POP.
SF2 is pretty bright as-is, but I was hoping to play around with it a bunch.

First issue:  The manual for R+B is a terrible representation of the actual lighting.  Light type are WRONG in a bunch of spots, and a few lights are omitted.
I ordered coloured LEDs for the B-O-M-B targets, according to the manual, but oh hey, they are ACTUALLY 44s, not 555s.  grrrrr

Here is the lighting under the 8 WABAC values.  we have 6 #555 bulbs on the board, with the last 2 as #44s.  The blue and yellow upright target lights are also #44s.   The manual?  Said they were all #555s...  *uggh*


2nd issue:  A while back I had noticed that the left "Aesop" scoop can also be used to light the WABAC value, just like the shot up the center, but alas the light was out!  Now with LEDs in hand I went in to fix it and....  ummm.  Wait.
It looks like an insert from a distance,but on closer examination, it isn't!  Did they forget to cut it out?
 So, not REALLY an issue, but certainly a curiousity.

Underneath, you can see there aren't even any markings for it, but certainly there would have been enough room had they wanted to.  So weird.


I popped LEDs in to the WABAC awards, the rollovers at the top, and a few of the upper flashers, and at least those look good.
One thing to note is that after inserting they aren't as stable it seems, and I had to go back in 2 or 3 times too wiggle the connection.  I wonder if there will be intermittentcy issues with them due to repeated openings of the playfield?

I did finally get an LED in to the Boris button / plunge button.   The issue before was that the domed LEDs I had were a TOUCH too long to fit in to the chassis.  I swapped out a low-clearance LED from the Flintstones (popped a domed LED in to there and you can't tell the difference,) put that one in to the lamp socket and...  gah I had broken a wire.  The hack-ful button strikes again!  I had figured the capacitor had branched of it, meeting with the wire at the cabinet as part of grounding.  My multimeter confirmed otherwise:  their junction point wasn't connected to ground, despite being super close.  So I ended up stripping the wire a bit and soldering it direct to the capacitor that branched off of the launch button.
In the end?  It was cleaner and more accessible than what was there before.
And the Boris target button?  GLOWS.  :)

it doesn't look like much, but the domed one on the left just didn't quite fit.


SF2 gave me a sad discovery, learning what "ghosting was.  I had always assumed ghosting was a property of the electrical system that the LED didn't turn off fast enough, thus leaving a ghost impression.  But I was wrong.
When the LEDs were off, they were still on.  Barely.  Gah, so annoying.  So I will have to make another order for SF2 for specific non-ghosting LEDs.
For most of the PF inserts, much of it is bright enough with incandescent, so I might leave much of it and just replace the green and purple lights with LEDs.
SF2 has the potential to be comically blinding with full LED treatments...


Also picked up this cute guy, to wrap around parts and get lighting in hard-to-see places while working...

On the to-do list front, I'm going to give up on the line item of "try and reduce speaker hum" because with the high voltages and the inability to industrial shield the audio circuits, it's really not worth the bother to investigate.


ROCKY & BULLWINKLE

STUFF TO DO
adjust flippers to the dots
replacing the SAVED decals.
find a replacement ramps / repair ramps
deep disassemble-everything clean (including under-playfield trough)
add more LEDs

DONE
clean flippers
get/install a Boris button
reconnect CN1 connector to increase reliability
install new levellers + casters, level the legs
wire Lion to 32 V instead of 50 V
replace the back box hat trick padding
Replace plastic Lion in hat trick
replace ball drain kicker
Update ROMs to 1.3
remove pop bumper screw.
repair first left orbit (hat trick) switch so that the diverter can work
CLEAN ALL THE THINGS.
replace beer seal


STREET FIGHTER 2

TODO
install cliffy protectors
get non-ghosting LEDs (and replacing dead bulbs)
clean + adjust the flippers
adjust left extra ball center target
deep clean of playfield, removing all plastics + replace upper-playfield rubbers
cleaning the under-playfield troughs
clean car-crash mech and re-affix car
replace playfield glass
Replace car crash flipper rubber + glue car to crash mechanism

DONE
got flipper replacement kit (holding on to it, will use it when needed)
got stargate ramp coils (but not reason to do it yet though)
fix 2 out lights in backbox
secure coin door
solder diode across the right slingshot coil.  Replace Q3 transistor on driver board.
left VUK: new spring, new plunger
get replacement fuses for under the PF
 re-secured VUK mounts to provide extra-strong kicks + added extra screws
installed lower playfield rubbers
installed new power module
replaced Q3 transistor to solve right slingshot issue
reattached ground wires
replaced VUK solenoid to correct one
replaced fuse for stargate ramps
reattach tilt mechanism
bend left playfield bracket back in to proper place
new beer seal
Flipper rubber for Chun Li
Replaced flipper rubbers (except car crash flipper)
Cleaned backbox charring + replaced dead + charred lightbulbs
initial basic playfield cleaning

Saturday, November 23, 2013

SF2: my second soldering success!

While to most people in this hobby, soldering is old hat.  But for me, getting back in to it means I can celebrate every tiny soldering victory (I almost typed 'victim'), no matter how banal.

Case and point, I got my backbox fully lit again.  Thank you soldering iron!


From the back, the upper left and lower right lights weren't working.
I got a new DMM recently with little hooked leads to allow for easy clipping on to wires.  I set the DMM to continuity test, and with my ground hook on one of the wires I should be able to touch the other part anywhere and get a beep, meaning they are connected.
Touching the lower screws on those two light assemblies resulted in no beep, meaning the solder connecting the wire to the metal plate had either gotten cold and separated, or was never properly attached.


While much of that scorching was already there in the lower right, I do fully expect the Soldering Gods to turn away in shame as I do my thing.

Instead of reposting the TODO list, I will just go update last post's list with this achievement.

Friday, November 22, 2013

SF2: pretty darn close to playing 100%!

A small flurry of progress with SF2:

I had my local tech in to attach a new 12N10L transistor in the Q3 spot on the driver board.   You might remember that the right slingshot coil had no diode across it, so was frying the Q3 transistor, resulting in the coil staying on.  Luckily I caught it before it burnt.  Popped out the F17 fuse and was still enjoying my game enough.
Now with diode on coil and the transistors arriving from marcospec, he swapped in the board component and voila, that's done.

Geoff, my lovely repair tech, has a great web site up at http://www.pinhead.ca/
I highly recommend him.
Oh hey and he brought old door parts and was able to secure the coin door!  Hurray for it not popping outward from the pressure of the interlock swithc and threatening to totally fall off without the lockdown bar in place.


I also have totally fixed the left VUK.  Previously I had a proper coil put in there so at least it could limp the balls out of the hole.  I also needed to re-affix the mount under the playfield as it was missing many screws.
The final steps was replacing the plunger and spring.  Here is what the old one looked like after I removed it:

so. sad.
Swapping it in was pretty easy.  It involved loosening the hole's switch to get access to the nuts for a plate that held the coil in position, then everything slides out cleanly.
The hardest part was finding the courage to trust the playfield in the upright position.  I didn't find it.  I did the whole repair with one firm hand keeping it vertical.


I also swapped in proper fuses for the few remaining ill-fused stragglers.  Right now the only incorrect fuse is F4, which has a 1/2 instead of 3/8.  Not sweating that one too much, but do still have some 3/8 ones on the way!

I reattached the subwoofer in a test, but it is so BUZZY.  I play my games with the volume somewhat low, so screw it, no sub.

So a few small things remain, but when the biggest issue is that you maybe want to replace the flippers?  NONE TOO SHABBY.


TODO
get flipper replacement kit
adjust left extra ball center target
deep clean of playfield, removing all plastics and cleaning the screws + replace upper-playfield rubbers
cleaning the under-playfield troughs
replace playfield glass
get cliffy protectors
Replace car crash flipper rubber + glue car to crash mechanism
replace stargate ramp coils (but not reason to do it yet though)replace upper left flipper solenoid with correct one  (should be A-25959) (have it, no reason to do it yet though)

DONE
fix 2 out lights in backbox
secure coin door
solder diode across the right slingshot coil.  Replace Q3 transistor on driver board.
left VUK: new spring, new plunger
get replacement fuses for under the PF
 re-secured VUK mounts to provide extra-strong kicks + added extra screws
installed lower playfield rubbers
installed new power module
replaced Q3 transistor to solve right slingshot issue
reattached ground wires
replaced VUK solenoid to correct one
replaced fuse for stargate ramps
reattach tilt mechanism
bend left playfield bracket back in to proper place
new beer seal
Flipper rubber for Chun Li
Replaced flipper rubbers (except car crash flipper)
Cleaned backbox charring + replaced dead + charred lightbulbs
initial basic playfield cleaning

Thursday, October 31, 2013

SF2: VUK mounts + outlane kicker

Problems found, problems fixed!

VUK MOUNTS
SF2 has 2 VUK units and they are one of the most heavily used components on the game, after the flippers themselves.  50% of all shots feed right to them.  E Honda, Zangief, Sagat, Ken & Ryu, M Bison, Balrog: each of those shots uses the VUK to get the ball back out.
SO when they are off, you REALLY feel it.  The VUKs were limping a bit so I checked under the PF and the mounting mechanisms for them were loose.  Tightening them up made the kickers play pretty much perfect!

But inspection gave rise to another head-scratcher:  Why are there so many screws missing???


SO. MANY. MISSING. SCREWS.


I went to Home Depot with screws from the machine in hand, and a lovely man in the screws isle helped me find replacements.
For your reference and mine, these are the screws that are used:


I added all missing screws and got it all tightened up.  Hopefully with a full set of screws in there things will come loose less quickly.


SAME PLAYER SHOOT AGAIN ISSUE
While playing the game a problem would occur erratically. (and erratic is the WORST type of problem.  Next to "thing catching on fire".)
A ball would enter the outhole, a new ball would be released to the shooter lane and then the machine says "SAME PLAYER SHOOT AGAIN!" over and over again.  Uh oh!

here is the outhole mechanism

2 balls loaded, 3rd ball would depress the switch


This is the kind of issue that I would love to work on with an EM, because you know that by looking at the schematics you can unveil the procession of logic that results in any state.
On a DMD, I was worried it'd be a bit more mysterious.  But luckily, I was able to solve it.

When the "Same player shoot again" would happen, I would note there was a ball still in the outhole.  Why was it still there?  Did the coil fail at kicking it out?  Did the coil fail to fire?
I took off the apron and figured out the issue:  there is a switch under there that indicates if a 3rd ball is loaded.  When a ball is released in to the shooter lane, the other 2 balls are supposed to roll forward.
The switch was bent in such a way that a ball could be precariously balanced in there to have not quite enough gravity to overcome the switch's resistance.  I think this is related to the fact I have the machine now set to maximum slant.
I was able to use needle-nose pliers to bend the switch a bit and so far so good:  the ball is not getting stuck in there any more.


here is ball 3, resting perfectly on the switch, thus causing the issue.  BEND THAT ISH!


Problems solved!

SF2 manual scan

I spent some times this week scanning in the SF2 manual. It might also be of interest to anyone who owns a Gottlieb System 3 game.
http://thetastates.com/pinball/Street_Fighter_2_pinball_manual.pdf

All of the schematics had to be re-assembled from 3 different scans, so they're not perfect, but all very good. And apparently the digital copy of this manual going around already wasn't so hot.
It is formatted to be optimized for digital viewing, not reprinting. I wanted all of the schematics as seamless as possible.

Thursday, October 24, 2013

SF2: installed some rubbers

I took some time and started installing a "rubber ring kit" in to Street Fight 2.

Lo and behold, I found another problem from the operators "handbook of things you really shouldn't do".

that white ring is for to go around those 3 posts.  Instead someone but tiny rubbers on 2 of the posts, and let the metal bar get SLAMMED in to the up/down post there.
I bent the metal piece away from the post and installed the proper rubber.

The upper area of the playfield is a pandora's box.  I can't quite figure out all of the screws to get in to it!  In order to finish my rubber replacing I will need to spend a day trying to get in there.
I will procrastinate on this, no doubt, but one day when I decide to do a DEEPER playfield clean I will eye tearing all the upper playfield mechs out and getting in there.  I can change the remaining rubbers then.

While getting to the lower playfield rubbers (and really most of the rubbers are in that lower playfield) I had to unscrew much of the metal ramps.  I took the opportunity to soak the screws and washers in Evapo-Rust and got much of their crusty rust off.  They don't all look pretty, but they do look less gnarly now.  Maybe I'll replace them, they are just screws, but if I can salvage the old parts, why not!

Look at those new white rubbers just GLOW!
In testing afterwards I did notice that the flipper rubbers aren't bouncing the ball well, a symptom of how they are a touch loose, so the ball loses momentum when colliding with them.
I have fresh flipper bats to install, so will add to the todo list:  replace flipper bats, and tighten/secure the flippers.


TODO
get replacement fuses for under the PF
also check the fuses at the transformer
left VUK: get new spring, new plunger
solder diode across the right slingshot coil.  Replace Q3 transistor on driver board.
replace stargate ramp coils
replace flipper bats, and tighten/secure the flippers.
deep clean of playfield, removing all plastics and cleaning the screws + replace upper-playfield rubbers
replace upper left flipper solenoid with correct one  (should be A-25959) (have it, no reason to do it yet though)
cleaning the under-playfield troughs
secure coin door
replace coon door lock
replace playfield glass
get cliffy protectors
Replace car crash flipper rubber + glue car to crash mechanism
reattach subwoofer
fix 2 out lights in backbox (wiring issue?)

DONE
re-secured VUK mounts to provide extra-strong kicks (though they need more screws!)
installed lower playfield rubbers
installed new power module
replaced Q3 transistor to solve right slingshot issue
reattached ground wires
replaced VUK solenoid to correct one
replaced fuse for stargate ramps
reattach tilt mechanism
bend left playfield bracket back in to proper place
new beer seal
Flipper rubber for Chun Li
Replaced flipper rubbers (except car crash flipper)
Cleaned backbox charring + replaced dead + charred lightbulbs
initial basic playfield cleaning

Tuesday, October 22, 2013

Pinrepair tech session #2

My repair guy came back the other day with a spare sleeve for the left VUK coil on SF2!
The plunger still needs to be replaced (the old one is really misshapen,) but lo' the ball gets kicked up now.  Not 100%, but 80%, so fine by me if there is an occasional misfire.  We'll have it fixed with the new plunger.

After testing it, we noticed the right slingshot was constantly engaged again.  ACK!  That means the Q3 transistor was once again blown, implying it was not a random failure.
He said "sometimes the diodes across the coil fail or crack".  So we looked under and hey, there was NO DIODE there.  Did it fall off?  How long had it been that way?
Anyways, add that to the list:
solder diode across the right slingshot coil.  Replace Q3 transistor on driver board.
IF we get that taken care of, it should stop blowing the transistor.

I had also made note in last post's todo list to replace the stargate ramp coils.  I only recently discovered this little tidbit about how the original ones aren't right for the job.

While waiting for him to arrive I decided to check the fuses under the playboard.  I found 1 under-fused and 2 over-fused!
get replacement fuses for under the PF
also check the fuses at the transformer

He also attached the new interlock switch to the cabinet, and bent the other door switch in to place so it registered properly.
The only issue with this is that the door is super loose, so these switches are basically pushing the coin door open/off.  He says he has spare door parts to secure it in place, as well I will look in to getting a proper lock for sealing it closed.  This will allow me to not have to rely on the steel bar....
secure coin door
replace coon door lock

Monday, October 14, 2013

updating the todo lists...

ROCKY & BULLWINKLE

STUFF TO DO
adjust flippers to the dots
try troubleshooting audio connections: excessive hum + hum sound oscillating with light show
replacing the SAVED decals.
find a replacement WABAC ramp.
get/install a Boris button
deep disassemble-everything clean

DONE
reconnect CN1 connector to increase reliability
install new levellers + casters, level the legs
wire Lion to 32 V instead of 50 V
replace the back box hat trick padding
Replace plastic Lion in hat trick
replace ball drain kicker
Update ROMs to 1.3
remove pop bumper screw.
repair first left orbit (hat trick) switch so that the diverter can work
CLEAN ALL THE THINGS.
replace beer seal


STREET FIGHTER 2

TODO
verify ratings of all fuses
left VUK: get new spring, new plunger
replace stargate ramp coils
deep clean of playfield, removing all plastics and cleaning the screws
replace upper left flipper solenoid with correct one  (should be A-25959) (have it, no reason to do it yet though)
cleaning the under-playfield troughs
firmly attaching the coin door
replace playfield glass
replace all playfield rubbers (have a rubber set)
get cliffy protectors
replace 3 Gottlieb flipper bats (have them)
Replace car crash flipper rubber + glue car to crash mechanism
reattach subwoofer
fix 2 out lights in backbox (wiring issue?)

DONE
installed new power module
replaced Q3 transistor to solve right slingshot issue
reattached ground wires
replaced VUK solenoid to correct one
replaced fuse for stargate ramps
reattach tilt mechanism
bend left playfield bracket back in to proper place
new beer seal
Flipper rubber for Chun Li
Replaced flipper rubbers (except car crash flipper)
Cleaned backbox charring + replaced dead + charred lightbulbs
initial basic playfield cleaning


BREAKSHOT

TODO
replace clip on left slingshot
replace upper-right flipper coil with replacement we have
replace/fix latch on center post locking mechanism

reduce strength of pop bumpers, if possible
level the legs (not pressing)
adjust flipper position to the dots
 

DONE
Add rubber casters to legs and drink holder to front right leg.
install the extra rubber pieces we received
Oiled upper right miniflipper.  Got it working, then learned you shouldn't do that.
Found out why machine freezes when at TILT:  was acting as an electromagnet
clean and wax
Fixed left outlane switch (adjusted height)
replace compression spring in center post.  discovered issue was more the ledge plate.
replaced beer seal
adjusted right inline switch so it registered

Saturday, October 12, 2013

pinball repair tech session #1

I had the pinball tech over today and it was a bit of a whirlwind!  I am still a bit of a deer-in-headlights with lots of stuff, it being all new to me, so it was amazing to see the speed and confidence that only so many years of work can condition.

Long story short:  he got so many things taken care of, and even some stuff that wasn't on my wish-list.  I didn't quite order all of the parts properly though, so he'll be back around on Monday to finish up the VUK.
As luck would have it, he recently took 2 dead Stargate machines and assembled one, thanks in part to the great accessibility of Gottlieb System 3 parts from Pinball Resource.  When I exclaimed that it was great so much was available, he reminded me that SO MANY System 3 machines have been scrapped.
They had major issues when they were released, and are really not too popular in the secondary market.  Check the games list.  Recognize any of these from the IPDB top 50 games?  Top 150?  Just Stargate, really.  SMB: Mushroom World gets a bit of love since it's a younger kid-oriented game.

Short story long:  Here's what he got up to.  (Down to?)

First thing he did was take the front apron off to remove the balls completely.  I hadn't taken it off before, so here's a shot of the ball mech for posterity:


Top priority:  inspecting Street Fighter 2 for damage from the big drop.  He found a coil at the back with a bent bracket, and aligned that with a quick bend.  No shorts, nothing else noticeably busted.

Instead of trying it then and there, he went straight to the other items I had mentioned.


The "stargate ramp" coil on the left was crispy and brown, but still seemingly functional.  He pulled it out and cleaned it a tad.  I will order a replacement but he got it going.  Popped in the new fuse, and another note on the hacks from the past operator:  the entirely wrong fuse was used.  As he noted, "an amp off can mean the difference between operating normally and a house burning down".  True that.
this is pretty much how I like my campfire marshmallows


Next up was putting in my power line module that I had bought (NOS) from Pinball Resource.  First there was the horror that when I got the machine it wasn't connected to ground.  Then there was the sigh of relief that while the F1 fuse was MELTED, they had hacked a fuse in on the backside.  Then the horror again, as we realized it was 2 amps over....
yeah, nuts to this.  I don't play around with line voltage.  goodbye, old power unit.

While at that part of the cap he got the ground wires reconnected.  Stripped each  side of the snip, soldering them together, and applied heat shrink tubing. 
tilt bob was reconnected shortly after photo was taken.  I suddenly have an appreciation for the inside-cabinet paint job!  Kinda psychedelic.

When "the accident" happened, I had been cleaning the inner-cabinet rails that held up the playfield, in hopes of making it more accessible.  He was having none of this nonsense and quickly spotted a critical offender.  The back-left playfield bracket was severely warped and causing major issues with sliding the playfield.  He removed it and bent it back in to shape with 2 wrenches and some muscle.
Experience counts.  I never would know, looking a this, that it was horribly wrong.  But it is.  Oh so wrong.

He took out the Williams coil on the VUK and put in the new one I had ordered.  Problem is, I didn't have the correct sleeve for it.  I did not know!  Alas...  While he got it in OK, it's misaligned, a touch loose, and doesn't get the ball up and out OK.
He will be returning Monday with some other Stargate spare parts to fix that last little bit.  It took a while to get to this point, a few fuses were popped, but we now have a plan of action.
This is the Williams coil that causes the ball to slam in to the glass.  Note the spring is bunk and needs replacing too, but as he mentioned, gravity is on our side.

My "mystery of the right slingshot" wasn't actually much of the mystery.  Looking at the schematics I posted, all fingers pointed to the Q3 transistor.  He took the board out, tested it with his DMM, and yup.   Failed.  Always on.
This part became another long part in the repair.   He initially soldered in replacement transistors, but they weren't the correct ones.    Luckily he had brought his spare Stargate driver board, and was able to use transistors from there.
His soldering was meticulous, barely discernible from the factory solder, except by brightness of the shine.

When the pin was turned on it was incredible to see it alive and not on fire!  Huzzah!

All the while during tests we had issues of it saying "same player shoot again", thus registering the outhole over and over again.  This was fixed by moving the balls around and avoiding triggering the outhole switch.  I might have to balance the machine better to avoid this, but we eventually got it to stop occurring.


Considering the level of carelessness the past operator displayed, something to do soon:  CHECK ALL FUSES TO MAKE SURE THEY ARE ACCURATE.  I am not trusting anything else about this machine.


He then moved on to Rocky & Bullwinkle.  I had whittled the problem down to the CN1 power connector, and he took it out, properly re-set the one wire, and now it seems to be aces.  We'll see how long the reliability holds, but so far so good.

Then, Break Shot, where I wanted him to look at the alignment of the left slingshot.  I was curious about how to move/realign it.
he took a gander and discovered alignment wasn't the issue at all, but a clip connecting the sling to the solenoid was busted.  Sure, I might have discovered this eventually, but it's another example of experience solving in 5 seconds what an amateur things about working on for weeks.


I am incredibly happy I made this one final pinball expenditure and will get all the big things taken off the list.
I am very much looking forward to Monday afternoon when I can finally play SF2 with all of the features 100%.

Thursday, October 10, 2013

mo pinball mo problems

This Sunday I am getting a local pinball tech in to run through a laundry-list of things I need help with.  I am all tapped out on pinball funds, but this will be worth it, and will be my last expenditure for 2013.
This guy is a veteran with 25+ years in pinball/arcade.   He says he can fix most machines in under an hour, but I scoff at that estimate and present my massive Plan Of Attack: A Summary Of All Things Broken Pinball!!!

This is my strategy, laid down in the order I think should be priority, with links and notes to whatever I could find on the issue.  The guys knows his stuff and doesn't need much from me, but if I can gather all of the reference photos and schematics in one place for him in advance, he might even be that much faster. 

1)  Inspecting Street Fighter 2 for shorts and other damage!
I had SF2 snap shut on me while I was under the playfield and I haven't turned it on since.  I found a similar story on pinside:  They had a short and when it turned on, they fried the board in a big way.
So finding potential shorts will be paramount, and who knows how long that might take.


2) replacing the SF2 Power Module Assembly
I posted this photo of the current Power Module Assembly.  Yeah, ugly.
So I bought a NOS (new old stock) one from Pinball Resource to replace it:
pretty!

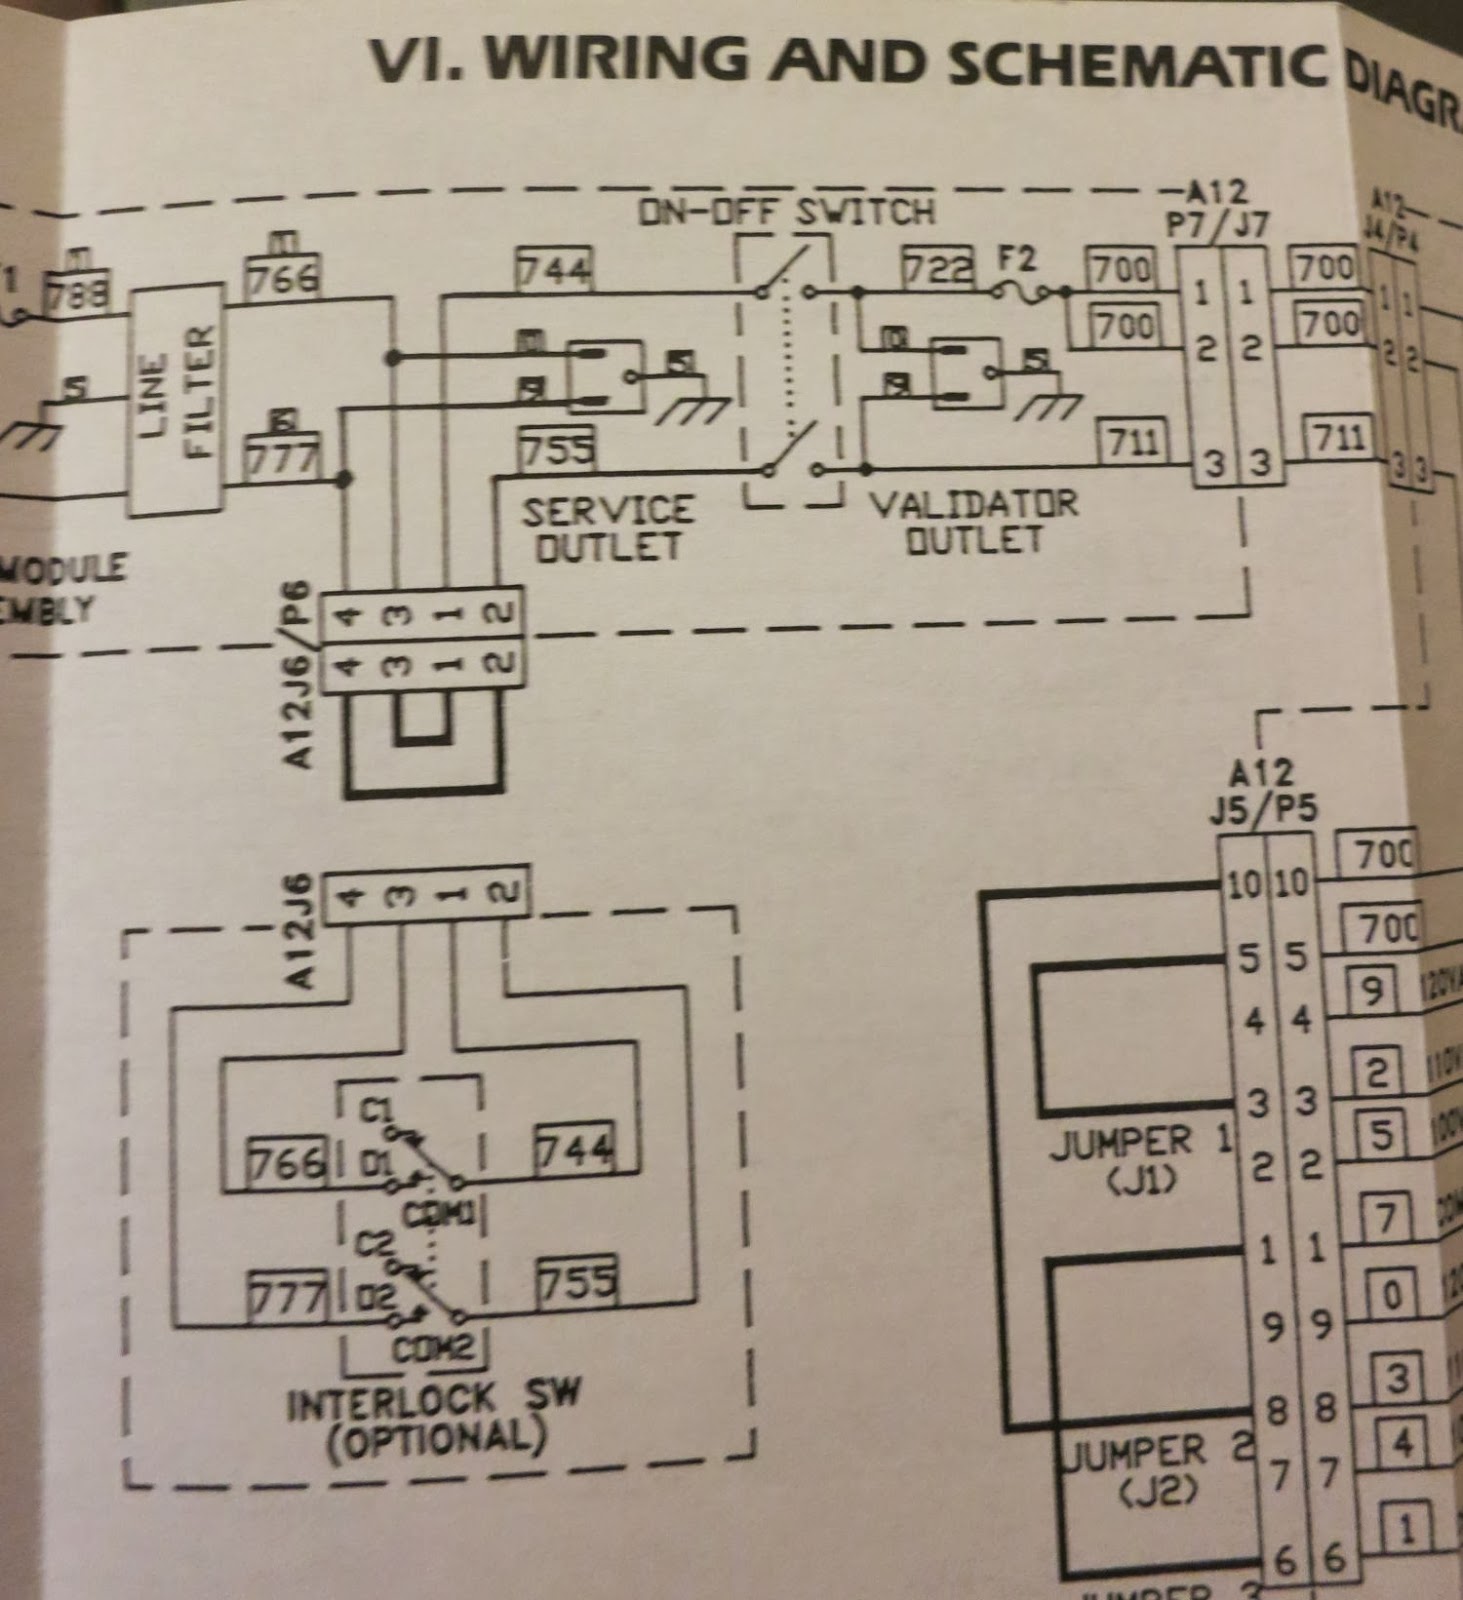
 pinwiki has a great little warningfor this section on Gottlieb System 3 games...
CAUTION!!! THE FOLLOWING SECTIONS BELOW DEAL WITH LINE VOLTAGE. LINE VOLTAGE CAN INJURE OR KILL. IF YOU ARE UNCOMFORTABLE WORKING AROUND LINE VOLTAGE, CALL A PROFESSIONAL REPAIR PERSON TO PERFORM THESE REPAIRS.

so yeah, definitely need a pro for this part.  Just in case, y'know?
They also have this:
Secondly, the F1 line voltage fuse may been blown. This is not too common, unless there is a catastrophic short in the game's power train, but some times fuses die from fatigue.
so.... let's play CSI here.  F1 one was MELTED.
The ground wires to the front were cut.  Pic1  Pic2

I am not sure if these are related, but omg suspicious, no???
At first I was also weirded out by the jumper on the old unit that fed right back to itself, but looking at the schematic we can see that it is optional.  Not sure if it would play in to the scenario though, because hey, sometimes having the power cut when you open the door is a good thing...


3) SF2: left slingshot solenoid engagement
I have documented this recent mystery issue extensively here and would love some expert eyes upon it.

4) SF2: replacing the fuse for the subways/stargate ramps
My theory is that the stargate ramps just have a blown fuse, since they are BOTH not working, and share the same fuse, but since the accident I haven't done anything, so I will have him look at this just to make sure it's as easy as I hope.  I have extra proper fuses ready!
the left ramp coil might be a tad sticky, which might have led to the fuse blowing.  I will have him take a look.

5) Rocky & Bullwinkle:  replacing/reseating the CN1 power cable
Documented here, I have discovered the reset issue with R&B is almost always back to the CN1 connector.
Not sure if he can re-seat things and clean it, or if I will have to order a new one for him to install.  I do not have this part.
From the pinrepair docs:
Power Supply Connectors CN1 and CN2.
On the power supply there are two "square" connectors (opposed to the inline connectors). Connector CN1 provides incoming power to the power supply board. Connector CN2 is a centralized ground plug. If either of these connectors have cracked or cold solder joints on the power supply board, random game resets can occur. Check these connectors for cracked or burnt pins on both the power supply board, and the connector plug. 


Also, there is this note from the pinrepair docs that would be awesome to have done:
For additional reliability on games Laser War to Guns N Roses, it is a good idea to solder an 18 gauge wire from the "+" lead of bridge DB1 to the "+" lead of capacitor C4. Solder another 18 gauge wire from the "-" lead of the bridge DB1 (the lead diagonal to the bridge's "+" lead) to the "-" lead of capacitor C1. These added wires will help prevent future problems with cracked solder joints on the power supply board components.
I saw the upper-right wire sparking in the connector, so def an issue there.


That's all of the major stuff!
If we are in hour 2 and somehow there is time left, here is a wishlist of other random tasks...

SF2: reattach ground wires at front (might be good to have him inspect since it relates to item #2)
SF2: replace left VUK solenioid with proper one (have the part)
Breakshot:  adjust left slingshot
SF2: replace upper left flipper solenoid with proper one (have the part)
oh and Geoff if you have any metal bits for securing the coin door, please do bring those too.
As well, that grease you were mentioning that was good for the playfield side rails...
and if there is any cash left in my coffers, maybe have him help me adjust the flippers to the dots?  A gal can dream.

Wednesday, October 2, 2013

I got attacked by Street Fighter 2.

I was working on my SF2, trying to clean the metal guide rails to make the playfield more accessible.  I'm not sure if it was my bad, or if it was flimsy, or a combination, but the support bar snapped down and the playfield came crashing down me.

It fell sideways (to its left side) in to the cab, and I caught hold of it.  I was dizzy from the smack to the head, and it had cut and hurt my hands.  Holding the PF there, it was far too heavy and large for me to maneuver.  I was a bit in shock and a tad panicked, not knowing what to do.
After about 10 minutes of straining I managed to allow the front metal bracket to the front of the cab and then use that as a pivot point to help rotated it over and get it back in place.

I was shook and hurt, and walked away to bandage the cuts in my arm.


I'm a bit terrified I ruined something in this, but I am resolved to not try turning it on without a professional on hand to assist me.  Making those arrangments soon.
I'm very much "once bitten twice shy".

I posted up about this at MAACA and someone gave the advice that I totally agree with:  Never use the support bar!
I got a lot of encouragement from the pinball community so decided to take another look tonight and see if I could spot any obvious damage.
In the act of lifting it up, I managed to cut/scrape my hand in 3 places, 2 needing a bandage.  So we have the Dhalsim fireball of the board blowing up, the Zangief body smash of the playfield falling on me, and now the Vega bladed slash to my blocking hand.  How appropriate.

But what is the first thing I see as I maneuver the playfield?
Uggh.


The playfield, on its side, crashed on to the transformer.  Looking at it, the transformer seems to have a badass bracket at the top, so I think there is a chance that it still functional!  The impact MIGHT have affected it, but it doesn't seem visibly rattled.  But oh I will still be waiting for assistance before that first power-on.

near the left metal bracket you can see the impact white impact strikes that weren't there before


the left side of the playfield also bear some inspection, but at a quick glance, I didn't spot anything.

that metal bracket on the left got bent in righting the playfield, but that's the only obvious damage

I still love you, playfield.

Thursday, September 26, 2013

SF2: new issues to tackle

I am waiting for my parts to arrive, so in the meantime, let's investigate other issues.
With the ground kind of wonky, the system made a big BooooOOOOOmmmm wow sound when you turned it on, and then had a loud hum.  At the bottom of the cab I disconnected the woofer and now it's much nicer to work on and turn off and on.


I got the driver board in, I put it on to tournament mode free play, and got a few days of good gameplay and analysis before I noticed something new:  
The right slingshot solenoid was always engaged.  Well, actually not always, but always engaged when the flippers were active.

The Q relay (upper right in schematic) is in the cabinet and controls the activity on the playfield.
It is normally off, and when engaged it allows the pop bumper, slingshots, and main flippers to be active.
When the Q relay is not engaged, the solenoid for the slingshot ("Right kicking rubber") is no longer on.


The connector in the upper left, above, is labeled A3J5 and comes in from the lightbox, the driver board.
Solenoid 2 is controller via Q3, R64, C14, and D3.


The first thing I was curious about was if the switches on the playfield were jammed on or had wiring issues.  I used my DMM and confirmed full resistance across the nodes, and zero resistance when I pressed the switch, so they were operating nominally.
Here they are represented in the switch matrix:
click to embiggen
The adjoining switches in the matrix also all work, so it's not a switch problem.
I wonder if there could be a spontaneous failure of a transistor on the driver board?
In the meantime I can remove Fuse 17 and just play without the slingshot kicker.

yeah I should go learn how to measure across these properly.


Another piece of the puzzle: 
When I go in to test mode, I get the main test mode screen saying "TEST MODE:  USE L FLIPPER TO CHANGE / R FLIPPER SELECT" but then NOTHING happens.  Left, right flippers, and start button, all do nothing there.  WEIRD.
I noticed this issue at the same time since the first step to look in to the solenoid issue was to check the solenoid and switch tests.


EDIT:  removed fuse 17, disabling the right kicker, and now the test mode works again.
Also:  the switches on the slingshot are fine, the lights still turn on when hit.  This does lead me back to the  driver board components, as the switches are shared for the lights and the solenoid, and those are fine, and at the back end of the circuit the Q is doing it's job fine, so it has to be somewhere after the switch matrix and before the solenoid.

Sunday, September 22, 2013

Street Fighter 2: documenting the issues

I'm going to move to a different format for lists.  Numbers won't cut it for this game.  It's a player's game.  It's been operated on, heavily.
There will be much damage to undo, and much healing to take place.
I will just put together a laundry list of things, sorting it from MOST IMPORTANT at top.
Then, I will put together a list of things DONE, just in the order I do them.

TODO
new Gottlieb System 3 power module + fuses
reattaching all of the ground wires
replace VUK solenoid to correct one (should be A-26450)
fix the ramp subways / Stargate ramps  (replacing fuse?)
deep clean of playfield, removing all plastics and cleaning the screws
replace left flipper solenoid with correct one  (should be A-25959)
cleaning the under-playfield troughs
firmly attaching the coin doorreplace playfield glass
replace all playfield rubbers
get cliffy protectors replace 3 Gottlieb flipper bats
Replace car crash flipper rubber

DONE
new beer seal
Flipper rubber for Chun Li
Replaced flipper rubbers (except car crash flipper)
Cleaned backbox charring + replaced dead + charred lightbulbs
initial basic playfield cleaning


This is a weird thing to have:  extended padding at the top of the VUK cover.  Reason?  The ball usually jumps out and BANGS the glass!  Reason?  I found there was a Williams coil in there, AE-24-900, when it should be a Gottlieb A-26450.  New part ordered.  And the playfield glass does need replacing, but not going to bother until this is under control.


This is the right VUK, and it works dandy.

This shows how a lot of the metal parts are going to need some love.


Here we can see the left and right ramps, and I call them Subways but they call them Stargate Ramps.  They are supposed to raise up, giving an extra shot, but neither do.  This seems suspicious!  I checked the schematics and found F25 is a fuse for BOTH, so time to order a replacement fuse.
Hopefully that will do the trick.

Thankfully, the software compensates in the mean time, accepting a successful shot up either ramp when really it is supposed to be open underneath.


Oh did I mention the coin door is basically held on by bubble gum?
ummmm nope.

Yeah...  let's get that taken care of.


F25 (bottom, 2nd from left) looks suspiciously different.


Add this to the list of weird power issues:  There is no LINE INPUT FUSE.  the whole thing looks melted.  PBResource has these entire units on special for $25 so I am just going to try and play it safe and get a replcement.  Oh and that ground wire in the upper right was NOT initially connected.
That fuse F1 is just before the "Line Filter", so who knows if and how that has potentially mucked things up, with the line filter being unprotected.
Once I get this replaced I will begin addressing the grounding issues, as well get in to the known Gottlieb System 3 grounding problems.


I am not sure if it is at all related, but I noticed some sparks/arcing by the right flipper.  the shooter lane assembly here is transparent, allowing you to faintly see through.


You can see the sparks in this short video: