Saturday, September 26, 2015

Central Park dabbling

I'll get this out of the way:  I am still scared of Central Park.  I can't bring myself to touch the front panel with it plugged in.

Check this start /"Replay" switch at the front of the machine.
ummmmmmm
Let's review:
The front plate?  metal.
Start button?  metal.
Switch stack?  metal plates.
Activated by?  Metal button pressing switches.
Switch voltage?  120V line voltage.
WHAT THE HELL COULD GO WRONG???

There was some worn fish paper and a piece of dried electrical tape.   What the hell kind of design was this?  Next time you complain about your electrician bill, please remember that safety codes are updated for very good reasons.

I wanted to play around with it a bit so I went out and asked the pinball community for an isolation transformer.
These are common in Ontario as, probably due to machines like we have here, were mandated by Ontario Hydro.  In a home environ with everything gone over, not really needed, but for the older games they were a great idea.
I even pulled one of these out of a Baywatch way back when.  For newer machines, they are still somewhat useful if one machine has a ground issues and someone touches lockdown bars on two machines in a row.
But everyone pulls them out because even if the game is off, they still draw a bit.

A quick aside, that thread I linked above had lots of gem information, including details about the bounce switch we had pondered in this machine.  A message I sent a friend:
Yeah, so that's a thing.
I so want a 1960s video of an operator going down the rows KICKING each of his machines to "turn it off".
WHY THE HELL WERE ON/OFF SWITCHES AN OBSCURE CONCEPT?

But here it is, in all of it's glory.  The circular metal bar in the center of that round plastic goes all the way down to the bottom of the cabinet so that yes, it can bounce if kicked.  If that circuit is opened, the voltage to the transformer temporarily disappears, the hold relay has lost power and disengages, turning off the GI and all power on the other wise of the transformer.


I got an isolation transformer from another collector in under 24 hours. rescuing it from the recycler:
this thing is over 10 pounds.  You could develop a workout regime around it.
One thing to note:  apparently if these things get hot, they are bad.  In the thread I linked, an operator relates the story of one catching fire in his workshop, and luckily being noticed immediately.


I put 5 layers of electrical tape in a stack and used that to buffer the start button.  Even with the isolation transformer and fresh tape barrier, I still pressed that start button with a plastic funnel.
I couldn't do it otherwise.
The game started chunking forward, but I went around back and noticed a whiff of smoke.  OMG NO!
Unplugged it right away.

I took a look at the rear stepper unit and behind it was this badass oldschool resistor.  But neither it nor the stepper solenoid were warm.
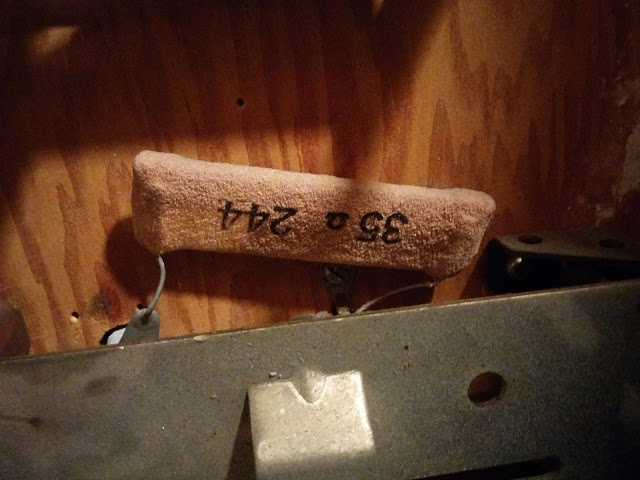
this might as well be a prop on The Flintstones


Next day:
Upon getting the machine, I had previously swapped out 2 x 20A fuses with 2 10A ones.  the main line fuse was 15A, but should have been 5A, so put that one in.
I raised the playfield and turned it on so I could better identify where the issue was, but aside from buzzing on the continuous solenoid relays, I couldn't find anything noticeable.  No smoke. 
I remain paranoid.


So instead of going further, I wanted to at least do something productive and clean the player stepper unit.
You can see the grime on all of the rivets and their paths

first look with the outer plate removed, only a bit of sanding done in the upper left.  Note how dirty the points are.

cleaned and reassembled.
Next week I'll see if I can start muster the courage to "solve" the start button issue, and hopefully find what was smoking.
I just want my game to look like something other than this:

Corvette: kickback, optos, light socket

Now that I have the parts I ordered to the Ottawa Pinball show, it's time to get back to work!

There are a few little things to do on Corvette.

first was replacing the kickback plunger with a new one, plus cleaning that general area.
no fear, i took this assembly out and cleaned everything.

old kickback vs new one
The kickback wasn't struggling, but I figured with the plastic bit crumbling away, time to replace it.

I also got a bunch of spare 555 bulb twist-and-lock sockets.  One under the playfield had snapped, so now I have replacements.


This still leaves me with 2 issues to figure out:
Modes started up the right ramp (CMIYC and Drag Race,) sometimes eject balls in to the shooter lane at the start of the mode.  CMIYC, multiball is only when you win [which is hard,] and while the drag race is easy, the balls should only be ejected at the end of it.
Since replacing the LT5 ramp, the lock kickout sometimes struggles, and I can't tell what's different.


For the right ramp I thought maybe the opto was dirty, and I was at least correct that there was dirty there.
this is the plate with the optos

the gunk that had been wiped off
After the cleaning, no change in behaviour.  still the occasional misfires.  I have no idea if has anything to do with this opto, but I do know that when I did not have it plugged in after rebuilding the playfield, it would ALWAYS behave in the wonky manner.

Intermittent problems are the WORST.

Monday, September 21, 2015

Introducing... Central Park!

Helllllllllllloooooooooooooo beautiful Central Park!!!


Sinbad left the basement to be shared at the 5th annual Ottawa Pinball & Gameroom show.  After that it went to a friend's house for a while, freeing up space for an extra project!

oh wait, something's not right here.
 So this machine was delivered as NOT WORKING, a challenge I readily accepted.

I left the playfield out so I could take a look at the transformer and all of them guts.
First thing though:  checking all of the fuses,  IT'S JUST A FUSE might some day be true.  Not the case here, all fuses worked, thought 2 slots had 20s instead of 10s, so fixed that.  All others, fine for continuity.

Just for a lark, I plug the machine in.   I go to hit the on button to test, and.... there's no ON switch.  Nothing.  Not sure what year they started using ON SWITCHES, but 1966 wasn't that year, let me tell you.
The game is supposed to be on just when plugged in.  OK, that seems perilous.

Next up was tracing the line voltage from the cord through the machine.  We start at the live line and attach a DMM node there.

we start at the beginning, Sherlock!

these 2 switches provided continuity.  The one on the right is extra odd, and would only seem to break if the machine was basically upside down, but I'm guessing people were rowdier in those days.

After the security switches, the line voltage comes to... this panel at the front.  Then connects via plug to THE COIN DOOR.  OH GOD DON'T CONNECT LINE VOLTAGE TO THE COIN DOOR.
Let's say that again:  OH GOD DON'T CONNECT LINE VOLTAGE TO THE COIN DOOR.
Stupid security switch there...

I then traced the return wires over to here, and you can see the black wires runs parallel and continues on...

And here is where the black wire runs to!  This is the hold (R) relay.

 At this point I dug out all of the long-detached labels and noticed the title...

ONE HUNDRED AND FIFTEEN VOLTS, ARE YOU KIDDING ME?
Yes, this is a stupid relay that allows the 115 volts to continue.  that's a lot of voltage to pump through a relay.

Using a wooden chopstick, I closed that relay and it LOCKED ON immediately.  The game motor ran, the lights were on, and the score reels reset to zero.  PROGRESS!

But now, why wasn't the hold relay coming on normally?
To the schematic!

Ok OK, I don't have a Central Park schematic, but I do have one for a 1963 Slick Chick, and while not 100%, will basically do the job.

CLICK TO EMBIGGEN!
Take note of that circuit.  one key thing is the 6 volts on the top side of the transformer.  That powers the lights.  If you don't have GI lights on, you're either getting nothing on that side of the transformer, or every single light is out.  A quick test with the DMM confirm that the transformer isn't powered.
So how does the power make a circuit?  The bottom line of the schematic is the line of switches we tested, but the SB relay needs to be activated to complete the circuit.  SB is activated by the coin chute or by pressing the replay button on the front with credits in the unit.

At this point I took a look at the credits unit up in the head:
No, I don't think that coiled wire is stock...
So there were 2 things odd with the credits unit:  This wire was wrapped around one of the poles that moved with the cogged disc, preventing it from advancing.
Also, when it went clockwise all of the way it went too far and would short the two switch banks.
I took the wire off from around that pole, and added some credits.  One other odd note:  The wheel that displays the credits is entirely misaligned by 180 degrees, so whether at zero or 15 credits, nothing will be displayed on the front.
I think my end strategy for this will be to jumper the switches and not have the credit wheel move, and always have the game on free play.  I don't need this mess.
But I also think it was mucking up the game.

So I've traced the SB (start) relay, it is on the backside of the playfield.  I think I've solved the main issue, a funky credit unit needing lots of love.
With everything connected, I plug the game in again and boom, all of the lights are on immediately.

I go to press the start button, aka the "Replay Button" and BUZZZZZZZZZZZZZZZZZZ
I depress the button, but am rewarded with a big electric ZAP.
the game starts, the balls are released, but I don't mess around with line voltage.

There is still a short somewhere.
Time to bring in some assistance and hunt down the short.

In the meantime, I get to start cleaning this beautiful dirty game up.