Saturday, October 24, 2015

Corvette: uh oh, I spoke to soon

Remember how I said the problem is solved?  Yeah I lied.
Played a game yesterday, and the balls were being ejected in to the shooter lane due to the route 66 kickout switch triggering the trough eject switch erroneously.

But what had  happened?  Open up the playfield, test the switch, and sudenly NOT triggering the trough eject.

So obviously this has something to do with the other normally closed switches on the switch matrix.

Which is here:
highlight are the two switches we focus on. #57 is hit, #37 fires erroneously as well


At this point, I want to point out this great video explaining some theory of a shorted diode that can cause switch matrix issues:
Highly recommended.

So we are forming a box, consisting of:
The switch hit
The switch erroneously firing
a normally closed switch
a bad diode that is allowing current to travel both ways

I wanted to check my box theory and try activating Skid Route 66 Exit (switch 58,) but quickly learned that IT DOESN'T EXIST.
It exists in the manual all right:


But that switch does not physically exist on the game, nor on the prototype photo up at imdb.org.


So great, we have an issue that involves both columns of "normally closed" switches.  I played the game and got it to the point where it was ejecting the troughs due to the ball being up in the route 66 kickout.
Turned it off, went in to switch test, and yes, pressing that switch was now triggering the Trough Eject.
What had changed?

I took the balls out of the trough, their being there or not did not change anything.
I unplugged the race track (switches 51, 52, 55 and 57) and voila, switch 57 was no longer triggering 37.

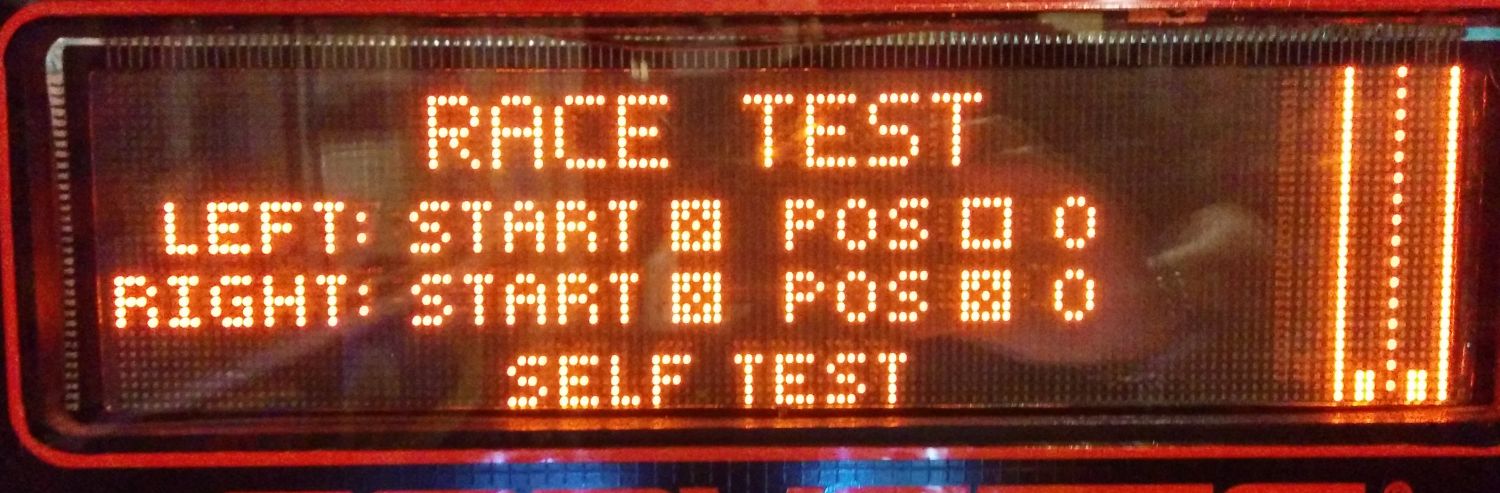
So then I put the machine in race test and started experimenting with going back to switch test with the cars at various positions, and that's where things confused me more.
There is a switch for each car to say whether they are at the starting line. (51 / 52)
Then there is 55 and 56 which have indicators, but also a number associated with position.
Sometimes the cars return to start and also have the box checked, sometimes not.  Sometimes they return to 0, sometimes to position 1....

In this position, all switches reporting closed, the matrix misfire was NOT HAPPENING:

All switches... closed... solves the problem how?

I am unsure how POS relates to the number beside it.

Since we can have POS > 0  and checked, and POS > 0 and not checked!

And we can have POS not checked at zero, and POS checked at zero.


Gah.  But anyways, I imagine when the box is checked it means the opto is being triggered, which would actually mean the switch is OPEN.
So if all 4 optos are triggered, then the switch matrix box can't be completed.

I will run through the logical combinations another day when I'm not so bleary eyed from lack of sleep.  Needless to say, I'm closer to tracing the bad diode down.  I do not think it is on the racetrack.  My money is on 35 or 36.

Thursday, October 22, 2015

Alien Poker: more progress

I want to spend a moment complaining about the length of EOS switches.  The old ones on this Alien Poker?  LONGER.

I got replacements,  the double-stack EOS on the bottom right flipper got swapped out, and the dang thing got stuck in the upright position!  What was happening?  The part of the flipper mech that hits the EOS switch was getting caught on the metal on the end.  The old one was like a 1/4" longer.
I eventually managed to bend a curve in to it so it does not get caught, but this was a pricey EOS stack!  I shouldn't have to do that.  Bleh.

This other EOS switch I have is the right length for the upper right flipper.

those actually line up to be the same length.


but not the left flipper..  WTF.
the new EOS only goes to where the bend starts in the old EOS

2 of the brackets have cracked coil stops.  Fun fun fun.  Oh and these are also the kinds where the coil stops are fused to the whole flipper assembly bracket.
ooops.


The spinner on  this game was sitting 90 degrees off, and the bars were just too bent to get it to sit in place, so I was given an old spinner from another game and swapped that in.
It sat perfectly and oh how satisfying this shot is now!
SO. MUCH. BETTER
(and yes I removed that old spinner from the playfield)

Another discovery was that the lockdown latch  (which is a bit bent) must have at one point cinched wires at the front of the playfield.  These got a bunch of electrical tape wrapped around them, but will need to be sealed properly with a heat gun.

eeeeep


I stumbled on a few spare rubbers to swap in.  While cleaning I had noticed that under each plastic there was a measurement for each rubber on the playfield artwork.  Convenient!  So I cleaned a bunch of the plastics, gathered a list of rubbers I would need to finish, and swapped in the rubbers that I did. 
This was also a good time to sub in the new rollovers lane I had bought/
soooooo much prettier than the faded old ones!

Finally, left sling was not working and I regapped it and it was working ok.  But, then it wasn't...  hmm might need to look in to that more.

Corvette: OMG DONE!

Good news, everyone!  The problem has been solved.
Remember how after the big disassembly shop job there was that one hella confusing issue?  I wrote about it a bit here, but I wrote about it more at pinside where I was hoping to get some help.

Short version:  the Route 66 kickout switch was fubared.  We replaced the microswitch + diode and now everything works.


Route 66 kickout assembly: switch and solenoid kicker

From the back, behind the rear wall on the playfield.  You'll note a missing screw, which probably didn't help.


Longer version:  when the route 66 kickout switch (switch #57) was hit it sometimes also phantom triggered the Trough Eject switch (# 37)
The Trough Eject switch is above the ball trough eject, and I guess detects if balls are jammed in there on top of each other.
When activated, the game tries to clear the trough by weakly pulsing the trough upkicker, and then strongly doing so.
When the Route 66 gate opened and the ball could then could sit in the kickout, a mode like CMIYC or Drag Strip Racing would begin, all the while the game is receiving continuous notification of the Trough Switch, and so while the modes are starting the game was clearing the balls out of the trough in to the shooter lane.
That is why the trough eject was firing even if there were no balls left in the trough.  It would keep firing until the Route 66 Kickout sent the ball out and around to the left inlane.

I am not expert on switch matrix issues, but testing all of the other switches in the rows and columns there was no other bleed through, just hitting the Route 66 kickout switch mistakingly triggered that other switch. 
So a new switch and diode was put in, problem solved.


Old switch and diode.


More rambles:  My first instincts with this was the optos.  This never happened before shopping the game, and happened immediately after the game got back together.  I then noticed I hadn't plugged the route 66 ramp opto connector in, and in the next game, everythiung was fine.
THIS WAS A TOTAL COINCIDENCE.  The switch matrix problem was intermittent, probably due to the switch not being attached properly behind the rear wall, and sometimes getting stuck.
Lesson learned:  Always check everything behind the back wall of a game as well.
The issue became crystal clear when, with the game on but not Started, touching that back switch causes the trough to kick.  So obviously then it was a utility function, and not indeed the gameplay code getting confused in any matter.
Good riddance, persnickety problem!


Trough opto board.  Notice the upper right LED is labeled JAM.
This is because the designers are HUGE Space Jam fans and that is for slamming a nasty dunk.


Oh, and the back gate of the LT5 wasn't raising.  Why not?  The spring wasn't connected.  Again, another solenoid sticking out the back.
Time to PLAY.

Monday, October 12, 2015

Central Park: mostly working!

With a local women's event coming up, I really wanted to get Central Park playing adequately, and there were a few problems to address.
The Yellow (1-5) and green (6-10) are their own separate banks.  Sometimes it seemed like not all of the numbers would properly reset (light) on each bank.

One big issue was that the 1-3-5 rollover was reseting the bank entirely!
I did some testing and realized it was any of the 1-3-5 or 6-8-10 rollovers that would do this.  When those are hit they lunch a relay that pulls down those individual relay banks.
The 2-4 and 7-9 rollover switches just try and pull both of their numbers down at the same time.  Some time this fails, meaning I probably need to clean those.

But on to the other relays, causing the resetes!

click to embiggen!
I started my search at this point in the schematics, thinking a short along the B and X switches allowing the 1-3-5 rollover to trigger a reset.
But that was before I realized the 6-8-10 was doing the same thing.  After spinning my wheels on the above stuff, the X and Y relays especially, I checked specifically the reset logic:

click to embiggen!

So while the X and Y relays are used to reset, so is the SB relay, so I inspected the Brown wire there, and that was the issue:
Not on, the switch is closed, and it shouldn't be.

and when closed, it is closed.  As it should be.

These switch banks handily pivot out for working on them.

After regapping that switch, those rollovers no longer caused the resets!

I tested the 5 targets, but then noticed a new issue:  The X relay was coming on, but then locking on!  Uh oh.
Why was it not locking on?  Check the top schematic, it is supposed to release on a motor position.  But, the motor wasn't running.

Why wasn't it running?
Yeah that wire probably goes to that empty lug.

With that reconnected on the X relay, the Y releay also required cleaning and adjusting.
With that taken care of, both banks were scoring properly and reseting when they should!

One downside of this game, if and when you get the middle targets past the 50 point mark to Special, they stop scoring.  For an EM game, specials are worthless.  I might consider modifying the game so it tops out at the 50 points mark.... hmmm

Oh and this was also in the 6-10 (+SB) bank.  The reset solenoid sleeve:
Yes, that is a crack that, like lightning, comes down, then does a 400+ degree rotation through the sleeve.

Still a few things that need to be made more reliable.
Locks need to be added to the back box and coin door...
LEDs need to be added to replace burnt bulbs...
But, mostly working!

Thursday, October 1, 2015

Central Park: getting it running!

Like a rat in a cage desperate for a food pellet but wary of the button that last shocked her, I stood pensively by Central Park.
I needed to play!!!!!!!!!!!

As oft with line voltage issues, I bring in external help to assist and verify.  I've been zapped a few times, and I want to limit it as much as possible.  We don't need any after school specials about how kids should avoid getting involved in pinball for fear of death by electrocution.

We put a lede on the door frame and started testing to find the short.  At first I thought the short was before the door connector, but it turns out it was the coin chute shorting to the metal frame.
Let that sink in:  metal coin chute, metal switches, metal door, and LINE VOLTAGE RUNNING THROUGH IT ALL.
I am going to be disconnecting the coin door wires altogether.  No point having extra line voltage running to the front.
As well, removing the slam tilt connection from the coin door.  Also line voltage.
I will just leave it at the start button.
This is a 1966 game.  No one cares for classic coin action startup behaviour and such, let's just get playing!

the jammed coin switch
In addition I took out the single piece of dried electrical tape buffering the metal button to the line voltage switch stack.  Replaced it with 5 layers of thick fresh electrical tape, and realigned the fish paper.
Once the jam was cleared the front was no longer electrifying!
I still want to do those mods to reduce the chance of future issues.  As it sits, it is one kid with a quarter away from fudging their way to an electric shock.


Oh hey, did I mention we got the game working?
WOOOO

The last barrier to getting the startup going was the "ball on" stack. 
A solenoid pulls down a lever that lets all of the balls queue up to the shooter lane.

here is how it was when I started:
how we found it, resting position

bent in to shape
At the bottom of the photos you can see the metal bit that pushes the stack outward.  That pulls out and closes the stack, and lets the balls in to play.
That solenoid is buzzy and stays active until any points are scored. (It's locked until the 10 or 1 point relays fire)


oh right the credit unit

One other thing required to get it running properly:  this buggy little credit unit.
Not only is the clock spring wound around the post on the cog, but there is a DELIBERATE short such that it will continually decriment the stepper past the zero position.
Let's look at one special detail in that photo:
well hello dancing wires

You can see the two wires at the front/top are BRAIDED TOGETHER.  When the switch hits zero position, the gap opens and thus the solenoid is not allowed to lower it any further.  Braiding the two wires together means it will ALWAYS be able to move past zero position, which is why we ended up with the overextension of the stepper, and a short amongst the switch plates.

Someone did this on purpose.  They are my nemesis.


With that all taken care of, the game played!

Some problems:
On the left (yellow) bank, numbers 1 and 2 were not going out when hit.  Under the playfield I closed those relays manually and they locked on.  (each number, 1-10, has their own relay.)
After that, those numbers work A-Ok.  They always say that the best maintenance for an EM is to play it regularly, and I think this is one of those situations.

After that, one big thing that immediately stood out was that when the green (right) number bank was completed, everything reset.  The left, when completed, would not reset.
I took a look at the bank of 1-5 relays and thought there might be a switch, like Surf Champ, where if all are on, it indicates that the bank is complete, triggering something else.

Here is the bank of 1-5, under the playfield.


these Gottlieb banks have these handy screws that allow you to readily rotate them to a more serviceable position.

I saw this odd switch poking at relay #2.  I had a very hard time seeing what it was up to though, even with the grace of pulling the relay bank outward.
well hello switch, you look like you do something!

from the other side, I added probes to make sure I could test the switch connection
So this switch had issues.  It was not closing when the #2 relay dropped, so with a bit of cleaning and bending I got it working.
Closed the machine, pressed start and...  BUZZZZZ the coil was locking on!  Easy fix though:  I had forgot to resecure the screws for that relay bank.  duhhh
That taken care of, game started properly.
And while this wasn't the fix I needed, it did help.

That odd switch I found was just used by the X relay reset sequence, so that game was no reseting certain cases a little bit better.


So there are still a few big issues:
The 1-3-5 rollovers just resets the yellow./left bank outright.
some of the rollovers lights all available, instead of just a single.
The left/yellow bank doesn't reset on completion, ubt the right/green resets all on completion.
the #7 light socket has issues, probably needs to be replaced


 so, plenty to look in to!