FireBrandX on pinside has done the world a great favour and scanned in a NOS plastics set they won off ebay. Most of them still had the blue plastic seal on them.
I have offered to host them. Download here: http://thetastates.com/pinball/rocky&bullwinklescans.zip
Thanks, Wolff!
Showing posts with label Rocky & Bullwinkle. Show all posts
Showing posts with label Rocky & Bullwinkle. Show all posts
Sunday, January 5, 2014
Saturday, December 21, 2013
learning the ins and outs of LEDs
My order arrived, brimming with LEDs to experiment with! Rocky & Bullwinkle has some dim lights near the back, so I definitely wanted to give them a POP.
SF2 is pretty bright as-is, but I was hoping to play around with it a bunch.
First issue: The manual for R+B is a terrible representation of the actual lighting. Light type are WRONG in a bunch of spots, and a few lights are omitted.
I ordered coloured LEDs for the B-O-M-B targets, according to the manual, but oh hey, they are ACTUALLY 44s, not 555s. grrrrr
2nd issue: A while back I had noticed that the left "Aesop" scoop can also be used to light the WABAC value, just like the shot up the center, but alas the light was out! Now with LEDs in hand I went in to fix it and.... ummm. Wait.
So, not REALLY an issue, but certainly a curiousity.
I popped LEDs in to the WABAC awards, the rollovers at the top, and a few of the upper flashers, and at least those look good.
One thing to note is that after inserting they aren't as stable it seems, and I had to go back in 2 or 3 times too wiggle the connection. I wonder if there will be intermittentcy issues with them due to repeated openings of the playfield?
I did finally get an LED in to the Boris button / plunge button. The issue before was that the domed LEDs I had were a TOUCH too long to fit in to the chassis. I swapped out a low-clearance LED from the Flintstones (popped a domed LED in to there and you can't tell the difference,) put that one in to the lamp socket and... gah I had broken a wire. The hack-ful button strikes again! I had figured the capacitor had branched of it, meeting with the wire at the cabinet as part of grounding. My multimeter confirmed otherwise: their junction point wasn't connected to ground, despite being super close. So I ended up stripping the wire a bit and soldering it direct to the capacitor that branched off of the launch button.
In the end? It was cleaner and more accessible than what was there before.
And the Boris target button? GLOWS. :)
SF2 gave me a sad discovery, learning what "ghosting was. I had always assumed ghosting was a property of the electrical system that the LED didn't turn off fast enough, thus leaving a ghost impression. But I was wrong.
When the LEDs were off, they were still on. Barely. Gah, so annoying. So I will have to make another order for SF2 for specific non-ghosting LEDs.
For most of the PF inserts, much of it is bright enough with incandescent, so I might leave much of it and just replace the green and purple lights with LEDs.
SF2 has the potential to be comically blinding with full LED treatments...
Also picked up this cute guy, to wrap around parts and get lighting in hard-to-see places while working...

On the to-do list front, I'm going to give up on the line item of "try and reduce speaker hum" because with the high voltages and the inability to industrial shield the audio circuits, it's really not worth the bother to investigate.
ROCKY & BULLWINKLE
STUFF TO DO
adjust flippers to the dots
replacing the SAVED decals.
find a replacement ramps / repair ramps
deep disassemble-everything clean (including under-playfield trough)
add more LEDs
DONE
clean flippers
get/install a Boris button
reconnect CN1 connector to increase reliability
install new levellers + casters, level the legs
wire Lion to 32 V instead of 50 V
replace the back box hat trick padding
Replace plastic Lion in hat trick
replace ball drain kicker
Update ROMs to 1.3
remove pop bumper screw.
repair first left orbit (hat trick) switch so that the diverter can work
CLEAN ALL THE THINGS.
replace beer seal
STREET FIGHTER 2
TODO
install cliffy protectors
get non-ghosting LEDs (and replacing dead bulbs)
clean + adjust the flippers
adjust left extra ball center target
deep clean of playfield, removing all plastics + replace upper-playfield rubbers
cleaning the under-playfield troughs
clean car-crash mech and re-affix car
replace playfield glass
Replace car crash flipper rubber + glue car to crash mechanism
DONE
got flipper replacement kit (holding on to it, will use it when needed)
got stargate ramp coils (but not reason to do it yet though)
fix 2 out lights in backbox
secure coin door
solder diode across the right slingshot coil. Replace Q3 transistor on driver board.
left VUK: new spring, new plunger
get replacement fuses for under the PF
re-secured VUK mounts to provide extra-strong kicks + added extra screws
installed lower playfield rubbers
installed new power module
replaced Q3 transistor to solve right slingshot issue
reattached ground wires
replaced VUK solenoid to correct one
replaced fuse for stargate ramps
reattach tilt mechanism
bend left playfield bracket back in to proper place
new beer seal
Flipper rubber for Chun Li
Replaced flipper rubbers (except car crash flipper)
Cleaned backbox charring + replaced dead + charred lightbulbs
initial basic playfield cleaning
SF2 is pretty bright as-is, but I was hoping to play around with it a bunch.
First issue: The manual for R+B is a terrible representation of the actual lighting. Light type are WRONG in a bunch of spots, and a few lights are omitted.
I ordered coloured LEDs for the B-O-M-B targets, according to the manual, but oh hey, they are ACTUALLY 44s, not 555s. grrrrr
 |
| Here is the lighting under the 8 WABAC values. we have 6 #555 bulbs on the board, with the last 2 as #44s. The blue and yellow upright target lights are also #44s. The manual? Said they were all #555s... *uggh* |
2nd issue: A while back I had noticed that the left "Aesop" scoop can also be used to light the WABAC value, just like the shot up the center, but alas the light was out! Now with LEDs in hand I went in to fix it and.... ummm. Wait.
 |
| It looks like an insert from a distance,but on closer examination, it isn't! Did they forget to cut it out? |
 |
| Underneath, you can see there aren't even any markings for it, but certainly there would have been enough room had they wanted to. So weird. |
I popped LEDs in to the WABAC awards, the rollovers at the top, and a few of the upper flashers, and at least those look good.
One thing to note is that after inserting they aren't as stable it seems, and I had to go back in 2 or 3 times too wiggle the connection. I wonder if there will be intermittentcy issues with them due to repeated openings of the playfield?
I did finally get an LED in to the Boris button / plunge button. The issue before was that the domed LEDs I had were a TOUCH too long to fit in to the chassis. I swapped out a low-clearance LED from the Flintstones (popped a domed LED in to there and you can't tell the difference,) put that one in to the lamp socket and... gah I had broken a wire. The hack-ful button strikes again! I had figured the capacitor had branched of it, meeting with the wire at the cabinet as part of grounding. My multimeter confirmed otherwise: their junction point wasn't connected to ground, despite being super close. So I ended up stripping the wire a bit and soldering it direct to the capacitor that branched off of the launch button.
In the end? It was cleaner and more accessible than what was there before.
And the Boris target button? GLOWS. :)
 |
| it doesn't look like much, but the domed one on the left just didn't quite fit. |
SF2 gave me a sad discovery, learning what "ghosting was. I had always assumed ghosting was a property of the electrical system that the LED didn't turn off fast enough, thus leaving a ghost impression. But I was wrong.
When the LEDs were off, they were still on. Barely. Gah, so annoying. So I will have to make another order for SF2 for specific non-ghosting LEDs.
For most of the PF inserts, much of it is bright enough with incandescent, so I might leave much of it and just replace the green and purple lights with LEDs.
SF2 has the potential to be comically blinding with full LED treatments...
Also picked up this cute guy, to wrap around parts and get lighting in hard-to-see places while working...

On the to-do list front, I'm going to give up on the line item of "try and reduce speaker hum" because with the high voltages and the inability to industrial shield the audio circuits, it's really not worth the bother to investigate.
ROCKY & BULLWINKLE
STUFF TO DO
adjust flippers to the dots
replacing the SAVED decals.
find a replacement ramps / repair ramps
deep disassemble-everything clean (including under-playfield trough)
add more LEDs
DONE
clean flippers
get/install a Boris button
reconnect CN1 connector to increase reliability
install new levellers + casters, level the legs
wire Lion to 32 V instead of 50 V
replace the back box hat trick padding
Replace plastic Lion in hat trick
replace ball drain kicker
Update ROMs to 1.3
remove pop bumper screw.
repair first left orbit (hat trick) switch so that the diverter can work
CLEAN ALL THE THINGS.
replace beer seal
STREET FIGHTER 2
TODO
install cliffy protectors
get non-ghosting LEDs (and replacing dead bulbs)
clean + adjust the flippers
adjust left extra ball center target
deep clean of playfield, removing all plastics + replace upper-playfield rubbers
cleaning the under-playfield troughs
clean car-crash mech and re-affix car
replace playfield glass
Replace car crash flipper rubber + glue car to crash mechanism
DONE
got flipper replacement kit (holding on to it, will use it when needed)
got stargate ramp coils (but not reason to do it yet though)
fix 2 out lights in backbox
secure coin door
solder diode across the right slingshot coil. Replace Q3 transistor on driver board.
left VUK: new spring, new plunger
get replacement fuses for under the PF
re-secured VUK mounts to provide extra-strong kicks + added extra screws
installed lower playfield rubbers
installed new power module
replaced Q3 transistor to solve right slingshot issue
reattached ground wires
replaced VUK solenoid to correct one
replaced fuse for stargate ramps
reattach tilt mechanism
bend left playfield bracket back in to proper place
new beer seal
Flipper rubber for Chun Li
Replaced flipper rubbers (except car crash flipper)
Cleaned backbox charring + replaced dead + charred lightbulbs
initial basic playfield cleaning
Tuesday, December 17, 2013
my inexperience shows
It is important to remember that things I thought were a problem weren't actually that problem.
Spring for Break Shot not holding the up-post? Actually a bent bar.
Slingshot misalignment for Break Shot? Actually broken clip on the slingshot.
Cold soldering on R+B power board? Actually just a single loose wire in a connector.
Dead switch on R+B? Just a bad connector.
Dead switch on Break shot? misaligned lane switch.
Dirty rails on the SF2 cab? a huge issue was the bent metal at the back of the playfield!
My old Breakshot is now back how with its loving new/old owner, and he was kind enough to email me an update about it. He filed the switch inside the cabinet and now the upper flipper plays brilliantly, able to return a Super Cue shot from the left back to the right! It never did that for me, and I assumed dirty coil. But nope, he fixed parts I hadn't considered, and it's better than ever now.
So to remember: Stop and take a pause when I THINK I know what the issue is. Or worse, consider an alternative if I think something is NOT an issue...
Kind of sad I got rid of Break Shot, but Flintstones is certainly worth it. Mind you, the question is should I have gotten rid of Rocky + Bullwinkle instead? But, the guy was lined up, ready to pick up, so it was certainly the most manageable thing to do, to sell Break Shot.
A quick digression, where I wanted to talk about how amazing the guy who bought my Break Shot is.
HE MADE A TRIPLE-HEADED PINBALL MACHINE! Check game play here.
And here is a vid on how it works:
(he also shows off his amazing Rat Race!)
I took some time tonight to take out the coils for R+B and give it all a good cleaning. Put it back and WOW, yep, a noticeable difference. I was thinking I had the slope too high on the game, but now that the flippers were cleaned and filed, the game plays that much better and that right ramp isn't prohibitive. I did file the metal rods in the flipper coil a touch. They weren't super mushroomed or anything at the end, but every little bit helps I imagine.
I think my goal for the time being will try and "dial in" Rocky + Bullwinkle as much as possible to see if I can get it notched above Street Fighter 2 in my fave column.
Heck, Rocky + Bullwinkle would be better than SF2 if I could run a trace on the ROM and find the variable countdown timer for ball-save and put it to something sane like every other game.
I would like to end by pointing out the fabulous progress on the Skit-B Pinball Predator game:
http://www.youtube.com/watch?v=lj-Pop41otk
So excited for all of those of you that are getting one!
Thursday, December 12, 2013
Rocky & Bullwinkle: adding a Boris button!
My R&B had been routed and had a few non-original parts installed as fixes, and I've done a pretty good job of getting it closer to it's original state.
I will never bother hunting for a Nell mechanism, but that is a pretty useless toy as far as I'm concerned. But from a presentation standpoint, I had always wanted to get the original Boris target button on the start button.
The old switch had been hacked in to place. The backs of these normally have 5 plugs, but mine only had 2, and then 3 wires soldered.
Well OK one was a wire that had a diode that attached at the left, the other had a wire that went to one plug, and then had a diode running to another plug. Then 2 normal plugs.

I didn't have any plugs or anything, and so I too would have to hack along if I wanted to get this installed!
First up was getting the white bit away from the black bit. On the NOS button, it was an effortless click. On this old one is was a battle of will and strength I had to walk away from twice until I could finally dislodge it.
The white piece slides out with a bulb on the end for easy replacement.
I noted the wires + connector locations, desoldered the wires from the connectors, and prepped to get my new switch wired up. I would have loved to just use this old switch, but it just didn't quite fit in to the new button chasis correctly.
Soldering is hard enough, but bending over in to the machine to do it certainly doesn't help!
I attached this clip to give added weight to the dangling mechanism while I worked on it.
And shockingly, I managed to reconnect it faster than taking it apart!
In the end the light isn't that bright, but when my LEDs come I will try putting an LED 555 in there.
It might have something to do with the hackzilla of wires in there? But ahh well, it's working fine at least.
Oh what's that? LEDs? Yes, I placed an order for some treats!
I am going to put LEDs at strategic places in SF2 and R+B. I also ordered Cliffy Protectors for SF2, as well a Gottlieb flipper rebuild kit. I maybe should have looked in to one that included the upper flipper as well, but at least having the bottom flippers rebuilt will be nice. Maybe with the know-how acquired form that endeavor I will be able to clean + tweak that upper SF2 slipper.
OK, I should stop talking about SF2, this is R+B's time to shine! Oh right, I also ordered the SAVED decals for R+B since one is missing on mine.
I am not sure if I will ever bother replacing the cracks in the R+B ramps since replacing them is costly and they don't damper game play. I might look in to restoring them, though.
I will never bother hunting for a Nell mechanism, but that is a pretty useless toy as far as I'm concerned. But from a presentation standpoint, I had always wanted to get the original Boris target button on the start button.
 |
| the old green button with the NOS Boris button that just arrived! |
The old switch had been hacked in to place. The backs of these normally have 5 plugs, but mine only had 2, and then 3 wires soldered.
Well OK one was a wire that had a diode that attached at the left, the other had a wire that went to one plug, and then had a diode running to another plug. Then 2 normal plugs.

I didn't have any plugs or anything, and so I too would have to hack along if I wanted to get this installed!
First up was getting the white bit away from the black bit. On the NOS button, it was an effortless click. On this old one is was a battle of will and strength I had to walk away from twice until I could finally dislodge it.
The white piece slides out with a bulb on the end for easy replacement.
I noted the wires + connector locations, desoldered the wires from the connectors, and prepped to get my new switch wired up. I would have loved to just use this old switch, but it just didn't quite fit in to the new button chasis correctly.
Soldering is hard enough, but bending over in to the machine to do it certainly doesn't help!
I attached this clip to give added weight to the dangling mechanism while I worked on it.
 |
| rawwrrr, stay put! |
And shockingly, I managed to reconnect it faster than taking it apart!
 |
| sure it's a hack, but it's MY hack. |
 |
| They totally ripped that off of Public Enemy. |
In the end the light isn't that bright, but when my LEDs come I will try putting an LED 555 in there.
It might have something to do with the hackzilla of wires in there? But ahh well, it's working fine at least.
Oh what's that? LEDs? Yes, I placed an order for some treats!
I am going to put LEDs at strategic places in SF2 and R+B. I also ordered Cliffy Protectors for SF2, as well a Gottlieb flipper rebuild kit. I maybe should have looked in to one that included the upper flipper as well, but at least having the bottom flippers rebuilt will be nice. Maybe with the know-how acquired form that endeavor I will be able to clean + tweak that upper SF2 slipper.
OK, I should stop talking about SF2, this is R+B's time to shine! Oh right, I also ordered the SAVED decals for R+B since one is missing on mine.
I am not sure if I will ever bother replacing the cracks in the R+B ramps since replacing them is costly and they don't damper game play. I might look in to restoring them, though.
Monday, October 14, 2013
updating the todo lists...
ROCKY & BULLWINKLE
STUFF TO DO
adjust flippers to the dots
try troubleshooting audio connections: excessive hum + hum sound oscillating with light show
replacing the SAVED decals.
find a replacement WABAC ramp.
get/install a Boris button
deep disassemble-everything clean
DONE
reconnect CN1 connector to increase reliability
install new levellers + casters, level the legs
wire Lion to 32 V instead of 50 V
replace the back box hat trick padding
Replace plastic Lion in hat trick
replace ball drain kicker
Update ROMs to 1.3
remove pop bumper screw.
repair first left orbit (hat trick) switch so that the diverter can work
CLEAN ALL THE THINGS.
replace beer seal
STREET FIGHTER 2
TODO
verify ratings of all fuses
left VUK: get new spring, new plunger
replace stargate ramp coils
deep clean of playfield, removing all plastics and cleaning the screws
replace upper left flipper solenoid with correct one (should be A-25959) (have it, no reason to do it yet though)
cleaning the under-playfield troughs
firmly attaching the coin door
replace playfield glass
replace all playfield rubbers (have a rubber set)
get cliffy protectors
replace 3 Gottlieb flipper bats (have them)
Replace car crash flipper rubber + glue car to crash mechanism
reattach subwoofer
fix 2 out lights in backbox (wiring issue?)
DONE
installed new power module
replaced Q3 transistor to solve right slingshot issue
reattached ground wires
replaced VUK solenoid to correct one
replaced fuse for stargate ramps
reattach tilt mechanism
bend left playfield bracket back in to proper place
new beer seal
Flipper rubber for Chun Li
Replaced flipper rubbers (except car crash flipper)
Cleaned backbox charring + replaced dead + charred lightbulbs
initial basic playfield cleaning
BREAKSHOT
TODO
replace clip on left slingshot
replace upper-right flipper coil with replacement we have
replace/fix latch on center post locking mechanism
reduce strength of pop bumpers, if possible
level the legs (not pressing)
adjust flipper position to the dots
DONE
Add rubber casters to legs and drink holder to front right leg.
install the extra rubber pieces we received
Oiled upper right miniflipper. Got it working, then learned you shouldn't do that.
Found out why machine freezes when at TILT: was acting as an electromagnet
clean and wax
Fixed left outlane switch (adjusted height)
replace compression spring in center post. discovered issue was more the ledge plate.
replaced beer seal
adjusted right inline switch so it registered
Saturday, October 12, 2013
pinball repair tech session #1
I had the pinball tech over today and it was a bit of a whirlwind! I am still a bit of a deer-in-headlights with lots of stuff, it being all new to me, so it was amazing to see the speed and confidence that only so many years of work can condition.
Long story short: he got so many things taken care of, and even some stuff that wasn't on my wish-list. I didn't quite order all of the parts properly though, so he'll be back around on Monday to finish up the VUK.
As luck would have it, he recently took 2 dead Stargate machines and assembled one, thanks in part to the great accessibility of Gottlieb System 3 parts from Pinball Resource. When I exclaimed that it was great so much was available, he reminded me that SO MANY System 3 machines have been scrapped.
They had major issues when they were released, and are really not too popular in the secondary market. Check the games list. Recognize any of these from the IPDB top 50 games? Top 150? Just Stargate, really. SMB: Mushroom World gets a bit of love since it's a younger kid-oriented game.
Short story long: Here's what he got up to. (Down to?)
First thing he did was take the front apron off to remove the balls completely. I hadn't taken it off before, so here's a shot of the ball mech for posterity:

Top priority: inspecting Street Fighter 2 for damage from the big drop. He found a coil at the back with a bent bracket, and aligned that with a quick bend. No shorts, nothing else noticeably busted.
Instead of trying it then and there, he went straight to the other items I had mentioned.
The "stargate ramp" coil on the left was crispy and brown, but still seemingly functional. He pulled it out and cleaned it a tad. I will order a replacement but he got it going. Popped in the new fuse, and another note on the hacks from the past operator: the entirely wrong fuse was used. As he noted, "an amp off can mean the difference between operating normally and a house burning down". True that.
Next up was putting in my power line module that I had bought (NOS) from Pinball Resource. First there was the horror that when I got the machine it wasn't connected to ground. Then there was the sigh of relief that while the F1 fuse was MELTED, they had hacked a fuse in on the backside. Then the horror again, as we realized it was 2 amps over....
While at that part of the cap he got the ground wires reconnected. Stripped each side of the snip, soldering them together, and applied heat shrink tubing.
When "the accident" happened, I had been cleaning the inner-cabinet rails that held up the playfield, in hopes of making it more accessible. He was having none of this nonsense and quickly spotted a critical offender. The back-left playfield bracket was severely warped and causing major issues with sliding the playfield. He removed it and bent it back in to shape with 2 wrenches and some muscle.
He took out the Williams coil on the VUK and put in the new one I had ordered. Problem is, I didn't have the correct sleeve for it. I did not know! Alas... While he got it in OK, it's misaligned, a touch loose, and doesn't get the ball up and out OK.
He will be returning Monday with some other Stargate spare parts to fix that last little bit. It took a while to get to this point, a few fuses were popped, but we now have a plan of action.
My "mystery of the right slingshot" wasn't actually much of the mystery. Looking at the schematics I posted, all fingers pointed to the Q3 transistor. He took the board out, tested it with his DMM, and yup. Failed. Always on.
This part became another long part in the repair. He initially soldered in replacement transistors, but they weren't the correct ones. Luckily he had brought his spare Stargate driver board, and was able to use transistors from there.
When the pin was turned on it was incredible to see it alive and not on fire! Huzzah!
All the while during tests we had issues of it saying "same player shoot again", thus registering the outhole over and over again. This was fixed by moving the balls around and avoiding triggering the outhole switch. I might have to balance the machine better to avoid this, but we eventually got it to stop occurring.
Considering the level of carelessness the past operator displayed, something to do soon: CHECK ALL FUSES TO MAKE SURE THEY ARE ACCURATE. I am not trusting anything else about this machine.
He then moved on to Rocky & Bullwinkle. I had whittled the problem down to the CN1 power connector, and he took it out, properly re-set the one wire, and now it seems to be aces. We'll see how long the reliability holds, but so far so good.
Then, Break Shot, where I wanted him to look at the alignment of the left slingshot. I was curious about how to move/realign it.
he took a gander and discovered alignment wasn't the issue at all, but a clip connecting the sling to the solenoid was busted. Sure, I might have discovered this eventually, but it's another example of experience solving in 5 seconds what an amateur things about working on for weeks.
I am incredibly happy I made this one final pinball expenditure and will get all the big things taken off the list.
I am very much looking forward to Monday afternoon when I can finally play SF2 with all of the features 100%.
Long story short: he got so many things taken care of, and even some stuff that wasn't on my wish-list. I didn't quite order all of the parts properly though, so he'll be back around on Monday to finish up the VUK.
As luck would have it, he recently took 2 dead Stargate machines and assembled one, thanks in part to the great accessibility of Gottlieb System 3 parts from Pinball Resource. When I exclaimed that it was great so much was available, he reminded me that SO MANY System 3 machines have been scrapped.
They had major issues when they were released, and are really not too popular in the secondary market. Check the games list. Recognize any of these from the IPDB top 50 games? Top 150? Just Stargate, really. SMB: Mushroom World gets a bit of love since it's a younger kid-oriented game.
Short story long: Here's what he got up to. (Down to?)
First thing he did was take the front apron off to remove the balls completely. I hadn't taken it off before, so here's a shot of the ball mech for posterity:

Top priority: inspecting Street Fighter 2 for damage from the big drop. He found a coil at the back with a bent bracket, and aligned that with a quick bend. No shorts, nothing else noticeably busted.
Instead of trying it then and there, he went straight to the other items I had mentioned.
The "stargate ramp" coil on the left was crispy and brown, but still seemingly functional. He pulled it out and cleaned it a tad. I will order a replacement but he got it going. Popped in the new fuse, and another note on the hacks from the past operator: the entirely wrong fuse was used. As he noted, "an amp off can mean the difference between operating normally and a house burning down". True that.
 |
| this is pretty much how I like my campfire marshmallows |
Next up was putting in my power line module that I had bought (NOS) from Pinball Resource. First there was the horror that when I got the machine it wasn't connected to ground. Then there was the sigh of relief that while the F1 fuse was MELTED, they had hacked a fuse in on the backside. Then the horror again, as we realized it was 2 amps over....
 |
| yeah, nuts to this. I don't play around with line voltage. goodbye, old power unit. |
While at that part of the cap he got the ground wires reconnected. Stripped each side of the snip, soldering them together, and applied heat shrink tubing.
 |
| tilt bob was reconnected shortly after photo was taken. I suddenly have an appreciation for the inside-cabinet paint job! Kinda psychedelic. |
When "the accident" happened, I had been cleaning the inner-cabinet rails that held up the playfield, in hopes of making it more accessible. He was having none of this nonsense and quickly spotted a critical offender. The back-left playfield bracket was severely warped and causing major issues with sliding the playfield. He removed it and bent it back in to shape with 2 wrenches and some muscle.
 |
| Experience counts. I never would know, looking a this, that it was horribly wrong. But it is. Oh so wrong. |
He took out the Williams coil on the VUK and put in the new one I had ordered. Problem is, I didn't have the correct sleeve for it. I did not know! Alas... While he got it in OK, it's misaligned, a touch loose, and doesn't get the ball up and out OK.
He will be returning Monday with some other Stargate spare parts to fix that last little bit. It took a while to get to this point, a few fuses were popped, but we now have a plan of action.
 |
| This is the Williams coil that causes the ball to slam in to the glass. Note the spring is bunk and needs replacing too, but as he mentioned, gravity is on our side. |
My "mystery of the right slingshot" wasn't actually much of the mystery. Looking at the schematics I posted, all fingers pointed to the Q3 transistor. He took the board out, tested it with his DMM, and yup. Failed. Always on.
This part became another long part in the repair. He initially soldered in replacement transistors, but they weren't the correct ones. Luckily he had brought his spare Stargate driver board, and was able to use transistors from there.
 |
| His soldering was meticulous, barely discernible from the factory solder, except by brightness of the shine. |
When the pin was turned on it was incredible to see it alive and not on fire! Huzzah!
All the while during tests we had issues of it saying "same player shoot again", thus registering the outhole over and over again. This was fixed by moving the balls around and avoiding triggering the outhole switch. I might have to balance the machine better to avoid this, but we eventually got it to stop occurring.
Considering the level of carelessness the past operator displayed, something to do soon: CHECK ALL FUSES TO MAKE SURE THEY ARE ACCURATE. I am not trusting anything else about this machine.
He then moved on to Rocky & Bullwinkle. I had whittled the problem down to the CN1 power connector, and he took it out, properly re-set the one wire, and now it seems to be aces. We'll see how long the reliability holds, but so far so good.
Then, Break Shot, where I wanted him to look at the alignment of the left slingshot. I was curious about how to move/realign it.
he took a gander and discovered alignment wasn't the issue at all, but a clip connecting the sling to the solenoid was busted. Sure, I might have discovered this eventually, but it's another example of experience solving in 5 seconds what an amateur things about working on for weeks.
I am incredibly happy I made this one final pinball expenditure and will get all the big things taken off the list.
I am very much looking forward to Monday afternoon when I can finally play SF2 with all of the features 100%.
Thursday, October 10, 2013
mo pinball mo problems
This Sunday I am getting a local pinball tech in to run through a laundry-list of things I need help with. I am all tapped out on pinball funds, but this will be worth it, and will be my last expenditure for 2013.
This guy is a veteran with 25+ years in pinball/arcade. He says he can fix most machines in under an hour, but I scoff at that estimate and present my massive Plan Of Attack: A Summary Of All Things Broken Pinball!!!
This is my strategy, laid down in the order I think should be priority, with links and notes to whatever I could find on the issue. The guys knows his stuff and doesn't need much from me, but if I can gather all of the reference photos and schematics in one place for him in advance, he might even be that much faster.
1) Inspecting Street Fighter 2 for shorts and other damage!
I had SF2 snap shut on me while I was under the playfield and I haven't turned it on since. I found a similar story on pinside: They had a short and when it turned on, they fried the board in a big way.
So finding potential shorts will be paramount, and who knows how long that might take.
2) replacing the SF2 Power Module Assembly
I posted this photo of the current Power Module Assembly. Yeah, ugly.
So I bought a NOS (new old stock) one from Pinball Resource to replace it:
pinwiki has a great little warningfor this section on Gottlieb System 3 games...
so yeah, definitely need a pro for this part. Just in case, y'know?
They also have this:
The ground wires to the front were cut. Pic1 Pic2
I am not sure if these are related, but omg suspicious, no???
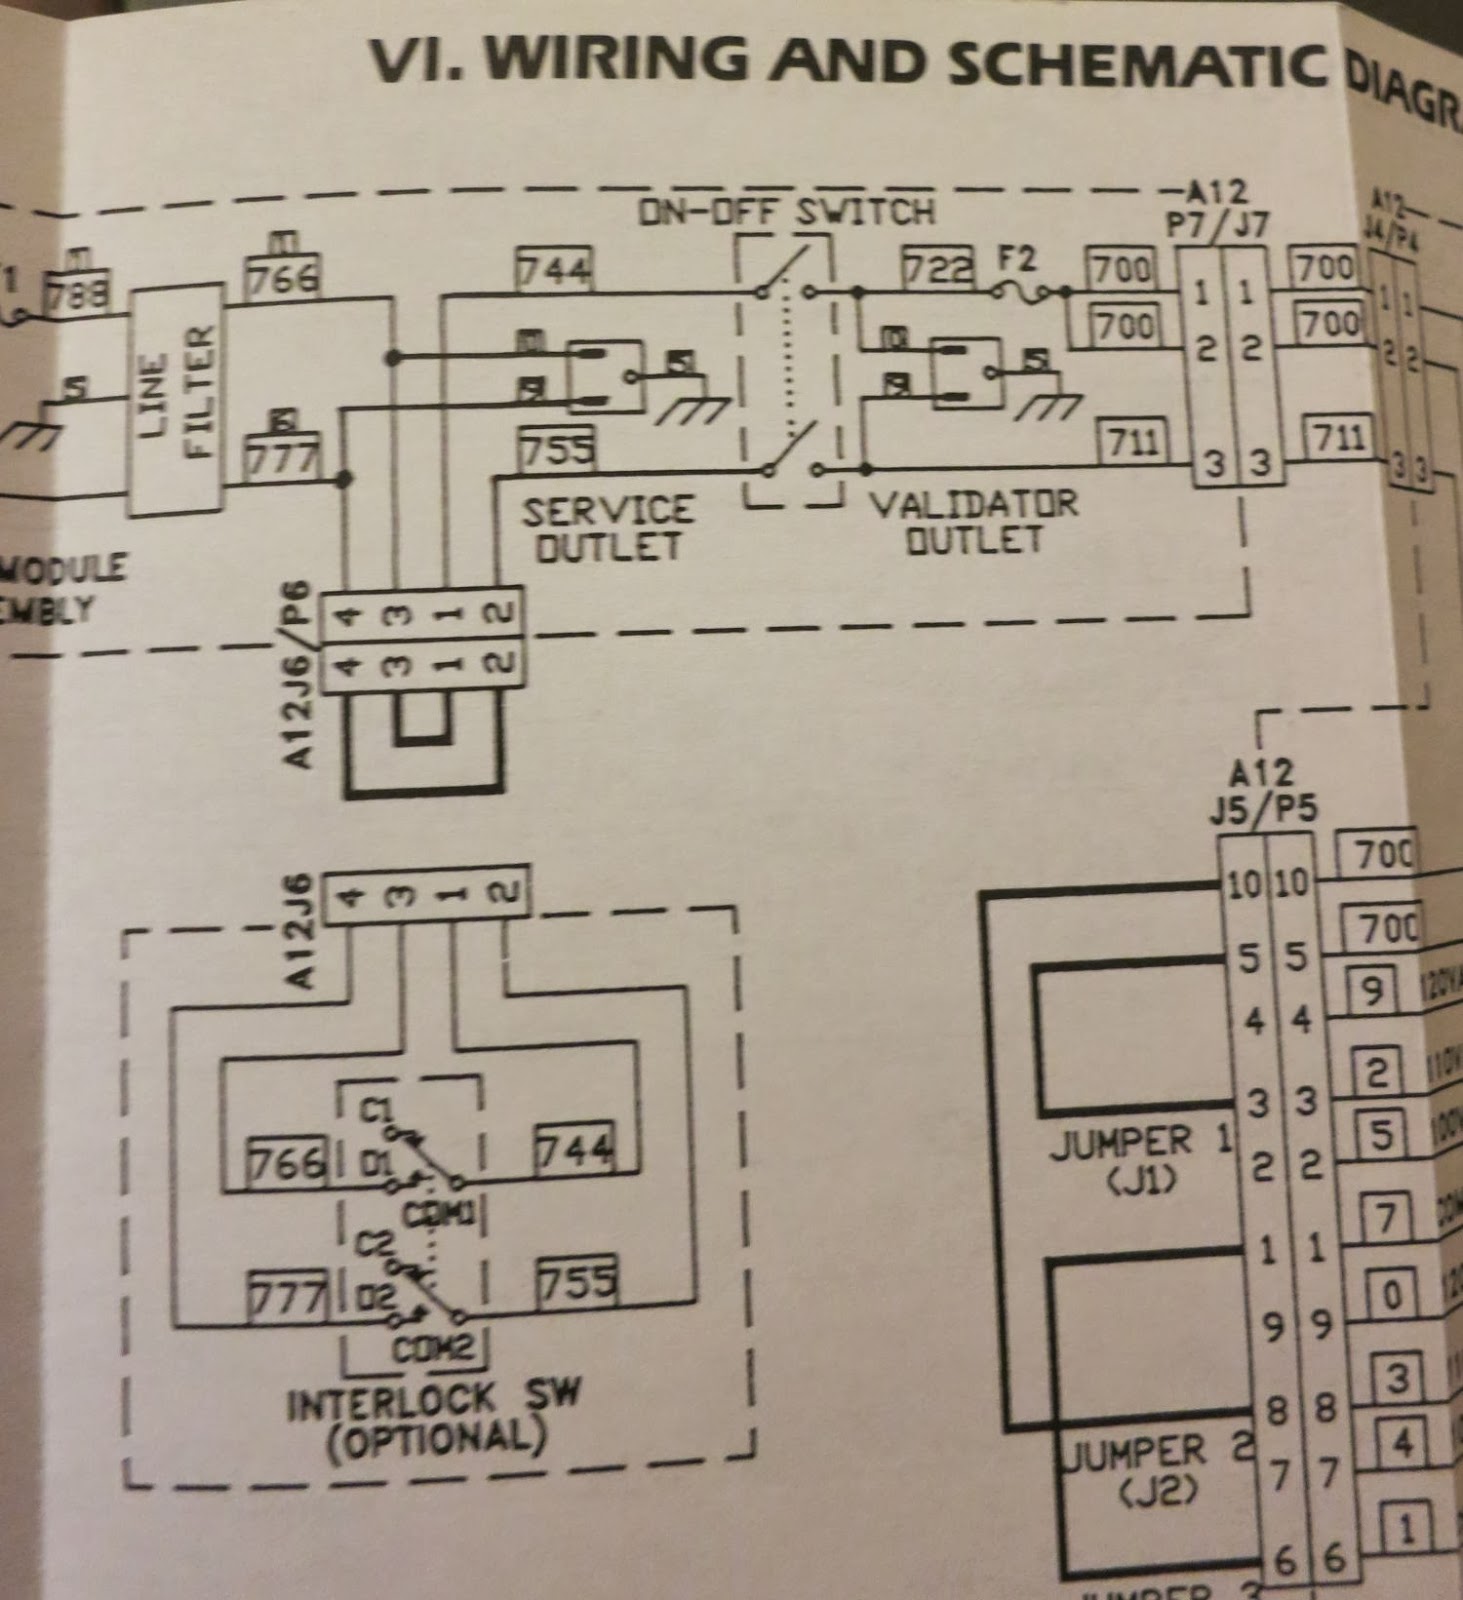
At first I was also weirded out by the jumper on the old unit that fed right back to itself, but looking at the schematic we can see that it is optional. Not sure if it would play in to the scenario though, because hey, sometimes having the power cut when you open the door is a good thing...

3) SF2: left slingshot solenoid engagement
I have documented this recent mystery issue extensively here and would love some expert eyes upon it.
4) SF2: replacing the fuse for the subways/stargate ramps
My theory is that the stargate ramps just have a blown fuse, since they are BOTH not working, and share the same fuse, but since the accident I haven't done anything, so I will have him look at this just to make sure it's as easy as I hope. I have extra proper fuses ready!
the left ramp coil might be a tad sticky, which might have led to the fuse blowing. I will have him take a look.
5) Rocky & Bullwinkle: replacing/reseating the CN1 power cable
Documented here, I have discovered the reset issue with R&B is almost always back to the CN1 connector.
Not sure if he can re-seat things and clean it, or if I will have to order a new one for him to install. I do not have this part.
From the pinrepair docs:
Also, there is this note from the pinrepair docs that would be awesome to have done:
That's all of the major stuff!
If we are in hour 2 and somehow there is time left, here is a wishlist of other random tasks...
SF2: reattach ground wires at front (might be good to have him inspect since it relates to item #2)
SF2: replace left VUK solenioid with proper one (have the part)
Breakshot: adjust left slingshot
SF2: replace upper left flipper solenoid with proper one (have the part)
oh and Geoff if you have any metal bits for securing the coin door, please do bring those too.
As well, that grease you were mentioning that was good for the playfield side rails...
and if there is any cash left in my coffers, maybe have him help me adjust the flippers to the dots? A gal can dream.
This guy is a veteran with 25+ years in pinball/arcade. He says he can fix most machines in under an hour, but I scoff at that estimate and present my massive Plan Of Attack: A Summary Of All Things Broken Pinball!!!
This is my strategy, laid down in the order I think should be priority, with links and notes to whatever I could find on the issue. The guys knows his stuff and doesn't need much from me, but if I can gather all of the reference photos and schematics in one place for him in advance, he might even be that much faster.
1) Inspecting Street Fighter 2 for shorts and other damage!
I had SF2 snap shut on me while I was under the playfield and I haven't turned it on since. I found a similar story on pinside: They had a short and when it turned on, they fried the board in a big way.
So finding potential shorts will be paramount, and who knows how long that might take.
2) replacing the SF2 Power Module Assembly
I posted this photo of the current Power Module Assembly. Yeah, ugly.
So I bought a NOS (new old stock) one from Pinball Resource to replace it:
 |
| pretty! |
pinwiki has a great little warningfor this section on Gottlieb System 3 games...
CAUTION!!! THE FOLLOWING SECTIONS BELOW DEAL WITH LINE VOLTAGE. LINE VOLTAGE CAN INJURE OR KILL. IF YOU ARE UNCOMFORTABLE WORKING AROUND LINE VOLTAGE, CALL A PROFESSIONAL REPAIR PERSON TO PERFORM THESE REPAIRS.
so yeah, definitely need a pro for this part. Just in case, y'know?
They also have this:
Secondly, the F1 line voltage fuse may been blown. This is not too common, unless there is a catastrophic short in the game's power train, but some times fuses die from fatigue.so.... let's play CSI here. F1 one was MELTED.
The ground wires to the front were cut. Pic1 Pic2
I am not sure if these are related, but omg suspicious, no???
At first I was also weirded out by the jumper on the old unit that fed right back to itself, but looking at the schematic we can see that it is optional. Not sure if it would play in to the scenario though, because hey, sometimes having the power cut when you open the door is a good thing...
3) SF2: left slingshot solenoid engagement
I have documented this recent mystery issue extensively here and would love some expert eyes upon it.
4) SF2: replacing the fuse for the subways/stargate ramps
My theory is that the stargate ramps just have a blown fuse, since they are BOTH not working, and share the same fuse, but since the accident I haven't done anything, so I will have him look at this just to make sure it's as easy as I hope. I have extra proper fuses ready!
the left ramp coil might be a tad sticky, which might have led to the fuse blowing. I will have him take a look.
5) Rocky & Bullwinkle: replacing/reseating the CN1 power cable
Documented here, I have discovered the reset issue with R&B is almost always back to the CN1 connector.
Not sure if he can re-seat things and clean it, or if I will have to order a new one for him to install. I do not have this part.
From the pinrepair docs:
Power Supply Connectors CN1 and CN2.
On the power supply there are two "square" connectors (opposed to the inline connectors). Connector CN1 provides incoming power to the power supply board. Connector CN2 is a centralized ground plug. If either of these connectors have cracked or cold solder joints on the power supply board, random game resets can occur. Check these connectors for cracked or burnt pins on both the power supply board, and the connector plug.
Also, there is this note from the pinrepair docs that would be awesome to have done:
For additional reliability on games Laser War to Guns N Roses, it is a good idea to solder an 18 gauge wire from the "+" lead of bridge DB1 to the "+" lead of capacitor C4. Solder another 18 gauge wire from the "-" lead of the bridge DB1 (the lead diagonal to the bridge's "+" lead) to the "-" lead of capacitor C1. These added wires will help prevent future problems with cracked solder joints on the power supply board components.I saw the upper-right wire sparking in the connector, so def an issue there.
That's all of the major stuff!
If we are in hour 2 and somehow there is time left, here is a wishlist of other random tasks...
SF2: reattach ground wires at front (might be good to have him inspect since it relates to item #2)
SF2: replace left VUK solenioid with proper one (have the part)
Breakshot: adjust left slingshot
SF2: replace upper left flipper solenoid with proper one (have the part)
oh and Geoff if you have any metal bits for securing the coin door, please do bring those too.
As well, that grease you were mentioning that was good for the playfield side rails...
and if there is any cash left in my coffers, maybe have him help me adjust the flippers to the dots? A gal can dream.
Thursday, October 3, 2013
Rocky & Bullwinkle: power issue discovered???
I got more gobbledygook on the DMD, meaning CPU board not powered, so I took some time to do a meticulous analysis of what WIGGLING might right things.
In the end, I don't think it's the capacitors.
While running through my tests, I noticed some tiny sparks coming out of this 3x4 connector:
So in that connector, the upper right wire was having tiny sparks. I uplugged it, squished the wire in a tad more, and yay the game plays.
So this might mean the board isn't in dire need of resoldering, just that connector needs work! So will my adjustments be enough? We'll see.
In the end, I don't think it's the capacitors.
While running through my tests, I noticed some tiny sparks coming out of this 3x4 connector:
 |
| center right. yeah you. |
So this might mean the board isn't in dire need of resoldering, just that connector needs work! So will my adjustments be enough? We'll see.
Wednesday, October 2, 2013
Rocky & Bullwinkle: replacing the feetsies
This had been lingering on the todo list: replace the icky metal feet on this machine, increase the playfield slant, and get it all levelled.
I had the parts since the Pinball Expo, but easier said than done! You want get the feet off? You have to support the machine. Always work late at night, alone? Then you gotta do it yourself.
The screws and bolts were covered in gunk, which I limited via some Simple Green. But taking a wrench to the bolts yielded no results, they were just too rusted.
Desperate, I poured 70% isopropyl alcohol over them, cleaned that 15 seconds later, and tried again. SUCCESS! The wrench moved the bolt, and after much struggle I was working them off.
Doing each replacement required being under the machine and supporting the leg's weight with my back. This is on solid concrete, with all that weight on my knees, a hot LCD torch in my face illuminating everything. Not a pretty site.
But successful nonetheless. I got new leg levelers, attached rubber casters, and then put moving pads under those.
STUFF TO DO
diagnose fix power board issues / replace/resolder capacitors
adjust flippers to the dots
try troubleshooting audio connections: excessive hum + hum sound oscillating with light show
replacing the SAVED decals.
find a replacement WABAC ramp.
get/install a Boris button
deep disassemble-everything clean
DONE
install new levellers + casters, level the legs
wire Lion to 32 V instead of 50 V
replace the back box hat trick padding
Replace plastic Lion in hat trick
replace ball drain kicker
Update ROMs to 1.3
remove pop bumper screw.
repair first left orbit (hat trick) switch so that the diverter can work
CLEAN ALL THE THINGS.
replace beer seal
I had the parts since the Pinball Expo, but easier said than done! You want get the feet off? You have to support the machine. Always work late at night, alone? Then you gotta do it yourself.
The screws and bolts were covered in gunk, which I limited via some Simple Green. But taking a wrench to the bolts yielded no results, they were just too rusted.
Desperate, I poured 70% isopropyl alcohol over them, cleaned that 15 seconds later, and tried again. SUCCESS! The wrench moved the bolt, and after much struggle I was working them off.
Doing each replacement required being under the machine and supporting the leg's weight with my back. This is on solid concrete, with all that weight on my knees, a hot LCD torch in my face illuminating everything. Not a pretty site.
But successful nonetheless. I got new leg levelers, attached rubber casters, and then put moving pads under those.
 |
| the old hardware. ick. |
STUFF TO DO
diagnose fix power board issues / replace/resolder capacitors
adjust flippers to the dots
try troubleshooting audio connections: excessive hum + hum sound oscillating with light show
replacing the SAVED decals.
find a replacement WABAC ramp.
get/install a Boris button
deep disassemble-everything clean
DONE
wire Lion to 32 V instead of 50 V
replace the back box hat trick padding
Replace plastic Lion in hat trick
replace ball drain kicker
Update ROMs to 1.3
remove pop bumper screw.
repair first left orbit (hat trick) switch so that the diverter can work
CLEAN ALL THE THINGS.
replace beer seal
Monday, September 30, 2013
Rocky & Bullwinkle: converting the Lion hat trick to 32 volts
I can solder! WOOT!
I dropped some coin on some basic electronic hobbyist tools, read some guides, watched some youtube, and had a very specific plan of action to abide by.
For the longest time the LION hat trick plastic was unobtanium. Each Rocky & Bullwinkle needed a new one, and up until recently there were no reproductions. And those reproductions are probably already sold out! (I got mine and replaced that a while back)
The reason they were so rare? The lion was wired to 50 volts, while the other 2 were given 32 volts. This is by design, maybe to make the lion seem scarier?
First thing I did was clean the assemblage a bit. I didn't bother taking it apart, but even so I could get some grime away from the pivot points and clean up the upper left guide wires.

And here is my handy-work!

It wasn't a fabulous job, but it WORKS! The wires are secure, I ran through the coil test, and we're allllll good.
The yellow/purple wire you see at the left is the 50V power wire. I bought some heat-shrinking wire tubing and a little torch, but failed a bit in putting butane in said torch, so I will do a better job closing off that wire later. For now, the electrical tape should suffice.
A selection of my soldering gear:
New list format....
STUFF TO DO
diagnose fix power board issues / replace/resolder capacitors
adjust flippers to the dots
try troubleshooting audio connections: excessive hum + hum sound oscillating with light show
replacing the SAVED decals.
find a replacement WABAC ramp.
get/install a Boris button
level the legs
deep disassemble-everything clean
DONE
wire Lion to 32 V instead of 50 V
replace the back box hat trick padding
Replace plastic Lion in hat trick
replace ball drain kicker
Update ROMs to 1.3
remove pop bumper screw.
repair first left orbit (hat trick) switch so that the diverter can work
CLEAN ALL THE THINGS.
replace beer seal
At this point, the only major thing left will be the power board capacitors. Once I get that issue resolved, the game will be playing 100% and everything else is really just small aesthetic stuff.
I dropped some coin on some basic electronic hobbyist tools, read some guides, watched some youtube, and had a very specific plan of action to abide by.
For the longest time the LION hat trick plastic was unobtanium. Each Rocky & Bullwinkle needed a new one, and up until recently there were no reproductions. And those reproductions are probably already sold out! (I got mine and replaced that a while back)
The reason they were so rare? The lion was wired to 50 volts, while the other 2 were given 32 volts. This is by design, maybe to make the lion seem scarier?
 |
| Stitched from a somewhat fuzzy scan going around. Click to embiggen. |
First thing I did was clean the assemblage a bit. I didn't bother taking it apart, but even so I could get some grime away from the pivot points and clean up the upper left guide wires.

And here is my handy-work!

It wasn't a fabulous job, but it WORKS! The wires are secure, I ran through the coil test, and we're allllll good.
The yellow/purple wire you see at the left is the 50V power wire. I bought some heat-shrinking wire tubing and a little torch, but failed a bit in putting butane in said torch, so I will do a better job closing off that wire later. For now, the electrical tape should suffice.
A selection of my soldering gear:
 |
| Starting in the upper left, going clockwise: wire stripped, flux paste, 16 gauge wire, brass tip cleaner, desoldering braid, 60/40 0.05mm solder, 25W Weller iron, solder pump. |
New list format....
STUFF TO DO
diagnose fix power board issues / replace/resolder capacitors
adjust flippers to the dots
try troubleshooting audio connections: excessive hum + hum sound oscillating with light show
replacing the SAVED decals.
find a replacement WABAC ramp.
get/install a Boris button
level the legs
deep disassemble-everything clean
DONE
replace the back box hat trick padding
Replace plastic Lion in hat trick
replace ball drain kicker
Update ROMs to 1.3
remove pop bumper screw.
repair first left orbit (hat trick) switch so that the diverter can work
CLEAN ALL THE THINGS.
replace beer seal
At this point, the only major thing left will be the power board capacitors. Once I get that issue resolved, the game will be playing 100% and everything else is really just small aesthetic stuff.
Wednesday, September 18, 2013
Rocky & Bullwinkle hat trick switch
One thing I'm learning here is to apply your newly gained/practiced knowledge against your earlier issues whenever possible.
I went back to Rocky & Bullwinkle, where the hat trick diverter has never worked since I got it. The switch wasn't responding, which means shooting the hat trick doesn't dunk the ball in to the VUK hole.
After spending a lot of time with wiring diagrams, I decided to pull out the R&B schematics and verified the switch matrix wire colours that correspond to the first left orbit switch.
I pulled up the playfield and found them and the connector that put them in to the loop. It is important to note that a whole bank of switches wasn't disabled, so the receiving connector is fine, they are passing their signal along it's merry way to the other switches in line.
The bottom wires run up to the switch on the playfield. I couldn't tell how secure and snug of a connection they were making, especially since I see the plastic wire coating on the terminating end.
I got out my dental pick (really, the most functional tool for pinball repair ever) and jammed the wires deeper in to the connector.
I also took a small piece of electrical tape, cut the width in half, and used that as a ribbon to secure that sub-connector to the wired connector. Plugged it back in to the chain, booted it up and LO! The Hat Trick worked!
The diverter is lightning fast, captures the ball in the VUK, and I am treated to the PROPER Hat Trick animation. Ball is then fed, oh so conveniently, to the left flipped.
Suddenly, the game becomes MUCH easier. :)
So... I guess I'm on fire tonight with the whole "figuring things out" groove. Another problem solved.
Strike off #10, and let's updates #13 and #5 to be more specific...
1) replacing the SAVED decals.
2) wire Lion to 32 V instead of 50 V
3) replace the back box hat trick padding
4) replace plastic Lion in hat trick
5) try troubleshooting audio connections: excessive hum + hum sound oscillating with light show
6) replace ball drain kicker
7) find a replacement WABAC ramp.
8) Update ROMs to 1.3
9) remove pop bumper screw.
10) repair first left orbit switch so that the diverter can work and the back glass animation can be awesome once more.
11) level the legs
12) CLEAN ALL THE THINGS.
13) diagnose fix power board issues / replace/resolder capacitors
14) replace beer seal
15) adjust flippers to the dots
I went back to Rocky & Bullwinkle, where the hat trick diverter has never worked since I got it. The switch wasn't responding, which means shooting the hat trick doesn't dunk the ball in to the VUK hole.
After spending a lot of time with wiring diagrams, I decided to pull out the R&B schematics and verified the switch matrix wire colours that correspond to the first left orbit switch.
I pulled up the playfield and found them and the connector that put them in to the loop. It is important to note that a whole bank of switches wasn't disabled, so the receiving connector is fine, they are passing their signal along it's merry way to the other switches in line.
 |
| the connector, disconnected. |
I got out my dental pick (really, the most functional tool for pinball repair ever) and jammed the wires deeper in to the connector.
I also took a small piece of electrical tape, cut the width in half, and used that as a ribbon to secure that sub-connector to the wired connector. Plugged it back in to the chain, booted it up and LO! The Hat Trick worked!
The diverter is lightning fast, captures the ball in the VUK, and I am treated to the PROPER Hat Trick animation. Ball is then fed, oh so conveniently, to the left flipped.
Suddenly, the game becomes MUCH easier. :)
So... I guess I'm on fire tonight with the whole "figuring things out" groove. Another problem solved.
Strike off #10, and let's updates #13 and #5 to be more specific...
1) replacing the SAVED decals.
2) wire Lion to 32 V instead of 50 V
5) try troubleshooting audio connections: excessive hum + hum sound oscillating with light show
7) find a replacement WABAC ramp.
11) level the legs
13) diagnose fix power board issues / replace/resolder capacitors
14) replace beer seal
15) adjust flippers to the dots
Rocky & Bullwinkle: further on the power issues
Did I mention how much I love Clay's blog?
He has an entry in there for a RaB that presents the same problem mine has occasionally: a bunch of jumbled lines on the display. the CPU board is not getting enough power, so the DMD basically just displays memory remnants.
He traces it back to capacitors C2 and C3, which sit next to a heat sink on the board. In his example, they were oozing their contents and obviously in need of replacement.
In my machine, everything LOOKS nominal.
so my machine was doing the funny display thing, and the lights on the CPU board weren't lit.
Turned it off and ran my finger across the capacitors and connectors, gave only the slightest jiggle, powered it on and it runs fine.
So obviously the issue is that something is starting to go on the power board. My inspection reveals no leaky capacitor jelly yet, so perhaps they are coming loose. Or failing... or both.
Next time it happens I will just focus on the capacitors. If I've isolated them, I'll just order more and have them replaced.
He has an entry in there for a RaB that presents the same problem mine has occasionally: a bunch of jumbled lines on the display. the CPU board is not getting enough power, so the DMD basically just displays memory remnants.
He traces it back to capacitors C2 and C3, which sit next to a heat sink on the board. In his example, they were oozing their contents and obviously in need of replacement.
In my machine, everything LOOKS nominal.
 |
| Nominal, eh? No one digging a hole back to earth? |
so my machine was doing the funny display thing, and the lights on the CPU board weren't lit.
Turned it off and ran my finger across the capacitors and connectors, gave only the slightest jiggle, powered it on and it runs fine.
So obviously the issue is that something is starting to go on the power board. My inspection reveals no leaky capacitor jelly yet, so perhaps they are coming loose. Or failing... or both.
Next time it happens I will just focus on the capacitors. If I've isolated them, I'll just order more and have them replaced.
Saturday, September 14, 2013
flipper dot alignment
See those drilled dots on the playfield near the flippers? Those are for alignment.
The flipper plastic (not the rubber) should rest atop them.
So obviously, I have work to do.
The flipper plastic (not the rubber) should rest atop them.
So obviously, I have work to do.
 |
| right flipper = too high. Left flipper = too low? |
 |
| both flippers, totally misaligned |
Rocky & Bullwinkle updates
Ever since I approached the ROM upgrade, I've had to be face-to-face with the weak connectors. I think I have isolated the connector issue to the power board. It's not so bad, except every once in a while the game resets. More obscurely, the audio board resets. The game play continues, but I hear the reset of the audio and on a subsequent cue it picks it up and keeps going.
I will probably have to rebuild some connectors, so let's update task item #13.
13) have power & ground board connectors rebuild for stability
I have to move the flippers a tad. So....
15) adjust flippers to the dots
1) replacing the SAVED decals.
2) wire Lion to 32 V instead of 50 V
3) replace the back box hat trick padding
4) replace plastic Lion in hat trick
5) try troubleshooting audio connections to eliminate hum, perhaps a ground missing?
6) replace ball drain kicker
7) find a replacement WABAC ramp.
8) Update ROMs to 1.3
9) remove pop bumper screw.
10) repair first left orbit switch so that the diverter can work and the back glass animation can be awesome once more.
11) level the legs
12) CLEAN ALL THE THINGS.
13) have power & ground board connectors rebuild for stability
14) replace beer seal
15) adjust flippers to the dots
I will probably have to rebuild some connectors, so let's update task item #13.
13) have power & ground board connectors rebuild for stability
 |
| that's the power board on the left. See the black electrical tape? That's because there was a loose wire connected to nothing. Where did that come from? I have no idea. But I taped it JUST IN CASE. Those power connectors need help. |
 |
| this is the power board. CN1, CN2, Cn7 are all suspects for my current issues. |
I have to move the flippers a tad. So....
15) adjust flippers to the dots
1) replacing the SAVED decals.
2) wire Lion to 32 V instead of 50 V
5) try troubleshooting audio connections to eliminate hum, perhaps a ground missing?
7) find a replacement WABAC ramp.
10) repair first left orbit switch so that the diverter can work and the back glass animation can be awesome once more.
11) level the legs
13) have power & ground board connectors rebuild for stability
14) replace beer seal
15) adjust flippers to the dots
Thursday, September 12, 2013
Rocky & Bullwinkle: fixing the outhole ball return assembly
I'm happy to get my outhole kicker fixed! It wasn't really impeding gameplay but it sounded like the machine chugged a bit as it strained to knock the ball from the outhole in to the line-up for the ball eject.
As you might remember from previous posts, the metal kicker bit was totally mangled. Here it is removed, compared against a shiny new one from Marco Spec
Oh hey so as as we can see instead of ordering a replacement part, a previous owner had just inserted a screw in to the playfield to prevent a full recoil and to allow for a workable smack of the ball.
Inserting screws in to the playfield seems to be there main troubleshooting technique! FUN! (remember, we had one up in the pop bumpers where on non-modded machines just a single skinny adjust post was. That was probably an area where the ball often got stuck after they committed to a design, and so inserted it just to help game play. I have none there, but a ball stuck there just instigates ball search, and the ball is guaranteed to enter the mystery hole, so no big deal)
PROBLEM SOLVED!
Back to the todo list:
1) replacing the SAVED decals.
2) wire Lion to 32 V instead of 50 V
3) replace the back box hat trick padding
4) replace plastic Lion in hat trick
5) try troubleshooting audio connections to eliminate hum, perhaps a ground missing?
6) replace ball drain kicker
7) find a replacement WABAC ramp.
8) Update ROMs to 1.3
9) remove pop bumper screw.
10) repair first left orbit switch so that the diverter can work and the back glass animation can be awesome once more.
11) level the legs
12) CLEAN ALL THE THINGS.
13) have that power/ground connector rebuilt!
14) replace beer seal
As you might remember from previous posts, the metal kicker bit was totally mangled. Here it is removed, compared against a shiny new one from Marco Spec
 |
| guess which one's the new one. I dares ya. |
 |
| getting it off only required removing the spring and taking off an E-clip. The coil's metal part had a joint allowing easy detachment. |
 |
| oh wait, that doesn't quite fit right... |
Inserting screws in to the playfield seems to be there main troubleshooting technique! FUN! (remember, we had one up in the pop bumpers where on non-modded machines just a single skinny adjust post was. That was probably an area where the ball often got stuck after they committed to a design, and so inserted it just to help game play. I have none there, but a ball stuck there just instigates ball search, and the ball is guaranteed to enter the mystery hole, so no big deal)
 |
| Here it is with the screw removed, the coil attached, the spring affixed, and the E-ring secured. |
PROBLEM SOLVED!
Back to the todo list:
1) replacing the SAVED decals.
2) wire Lion to 32 V instead of 50 V
5) try troubleshooting audio connections to eliminate hum, perhaps a ground missing?
7) find a replacement WABAC ramp.
10) repair first left orbit switch so that the diverter can work and the back glass animation can be awesome once more.
11) level the legs
13) have that power/ground connector rebuilt!
14) replace beer seal
Tuesday, September 10, 2013
OK, got Rocky + Bullwinkle back online again. There is a loose connector SOMEWHERE on the CPU board that I am going to have to rebuild, but by the time I got it going I stopped keeping track of which one I had reset. SO NEXT TIME, I will find it, flag it, and have that connector redone once and for all.
So 1.3 display and CPU ROMs are go! But ummm... I guess I can't tell the difference so far. I mean, YAY, I like seeing the 1.3 note at bootup, but so far, I don't notice much.
So 1.3 display and CPU ROMs are go! But ummm... I guess I can't tell the difference so far. I mean, YAY, I like seeing the 1.3 note at bootup, but so far, I don't notice much.
Monday, September 9, 2013
the order arrived, buuuuut....
Got my order in from Marco Specialties:

I how everything is labeled.
I do not like how a tiny 9 oz box cost $29 to mail.
Also 2 switches were not sent, but they did not refund any shipping, duty, or taxes that I had paid.
They at first said 1 would not be sent, but when it arrived both were missing, and only after did they offer to send a refund for the 2nd switch.
I wanted to immediately get up to version 1.3 so I checked this web site and figured I could install the ROM chips!
I was wrong. I suck.
I now have them installed but I am having power issues again and the game partially loses power to the CPU and uhhh yeah that sucks. I kind of wish I waited and got a professional to show me how.
I am leaving it for the night, will dive in again later this week.
Thursday, August 22, 2013
ordering parts
I placed my first big order for the new machines! When it was just the Royal Flush, PBResource.com had everything I needed, but with these newer ones I went to Marco Specialties to get my parts.
I researched all of the issues with my machines, decided on what could be done, made a big list, added everything to my cart, got to the checkout, and.... lost my confidence. The total was just too high, what with conversion, international shipping, and the taxes + duty prepaid. (TIP: If in Canada, be wary of how your stuff is shipped to you because the "convenience charge" of not having a customs broker is like $65 and is a scandalous USPS/UPS ripoff)
So tonight I broke it down:
List 1 is of things that I need to fix and/or maintain.
List 2 is of things that will make the machines prettier.
So here's what I ended up going for:
For Break Shot:
Rollover switch & bracket assembly kit #A-12688-1 $8.95
Spring - Capcom compression $1.35 #SG-00126
5 x Rubber ring - Black 27/64" or 7/16" OD $0.29 #38-2764B
4 x Rubber sleeve - black 7/8" 545-5009-00 $0.59
that will hopefully allow me to replace the bad rubbers, tighten up the center post, and fix the dead right inline switch.
For Rocky & Bullwinkle
kicker level assembly #515-5016-00 $9.95
spring extension $0.90 #265-5000-00 (to go with the above kicker, in case I muck up the replacement fix)
3 x Foam pad .6 in x .4 in x .25 in $0.23 #626-5069-00
Switch - subminiature with actuator $6.00 #180-5064-01
ROCKY & BULLWINKLE (DE) EPROM ROM0 A1.30 $10.00 #EPROM2198
ROCKY & BULLWINKLE (DE) EPROM B5GameA1.3 $10.00 #EPROM2197
This will allow me to fix the ball drain kicker, replace the standup target pads (btw I have 3 non-standard targets...), fix the Hat Trick switch, and get the game up to the final version of code.
And general parts:
2x Rubber protector 20" long standard $3.95/ea #23-6534
4 x Nut 3/8-16 hex 5/8" flat to flat LLN $0.18 #4422-01117-00
In total $120.70 CAD after conversion, duty, taxes, and shipping.
When I have money enough, I will eventually do a cosmetic order with new decals, plastic guards, LEDs, the Boris button, and a score card.
Thursday, August 1, 2013
Rocky & Bullwinkle power issue
OK so there was an issue coming from undoing the backbox wiring to get it downstairs. Some times while playing the game will just reboot. Or sometimes the audio will reboot. Once the DMD just displayed an error at bootup.
These issues I have mostly traced down to a single connector that feels a bit loose. It is a touch flimsy and I am not sure if it was this bad before disconnection, but it is the first thing I attend to if/when something does go wrong.
I had a guy over to help move the Royal Flush and he mentioned the connector, described it perfectly, and apparently they are notoriously bad. So add to the todo list:
13) have that power/ground connector rebuilt!
I am hoping that will solve the issue. It's very rare and erratic (oh, THOSE kinds of issues...) but at least I have a good starting point.
bar seals / beer seal
 |
| lockdown bar for Break Shot |
 |
| lockdown bar for Rocky & Bullwinkle |
Subscribe to:
Posts (Atom)