Saturday, April 30, 2016

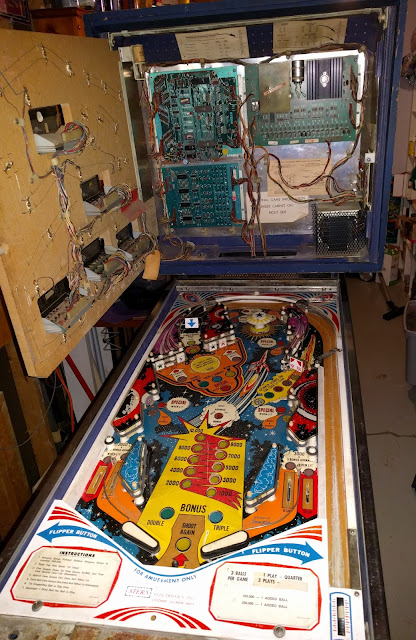
Introducing... Meteor???

Meteor?  Really?

Where is it?  It's not here...  oh wait there it is!


So yeah Meteor is at my friend's house.  He was converting his Blue Chip to LEDs, so I asked him yo also do Meteor, and that's when things spiraled out  of control.
Did you know that 1979 Stern games weren't made to handle LEDs? did you? DID YOU?? 

First up you need to add some resistance since LEDs have very little draw, and that's solved by this clever little kit.
Then you need your LEDs.
Then you need to fix the bulbs that aren't working by replacing a logic chip.
Then you need to realize you fixed the wrong thing and replace the SCRs for the lamps.
Then you need to realize the schematics were wrong and you replaced the wrong SCRs.

Follow the saga:


Friday, April 29, 2016

Sealing backglasses with Triple Thick

So I have this friend and...  well at first I sold him a pachinko I didn't have room for.  and then wouldn't you know it he had a basement and I needed a home for a pinball machine.  So he took my Sinbad.
Then I got a Meteor, and didn't have room, so he took that too.
Oh and hey he also bought a Blue Chip!

So oops, my bad, suddenly he has an arcade in his basement.

He is also a licensed electrician and breezes through tech issues in a tenth of the time they take me to address, so I will be posting up videos of his work as we go. 

But first up, I wanted to share his great videos about sealing backglasses with Triple Thick.  If you have any machine with a backglass, YOU NEED TO SEAL IT NOW.  Those things are falling apart more and more by the day, especially if you have incandescent bulbs back there.


Wednesday, April 6, 2016

Introducing... Stars!

Let's all gather to welcome the newest entry in the basement... Stars!
From 1978, it's one of the earliest solid state games, and the 3rd SS from Stern, using their M-100 MPU.


Apollo 13 is Done and Gone and I am so relieved.  From one space themed game to another, and to be quite honest I've already gotten more enjoyment out of Stars than A13.
One thing to note is the new preferred method for getting games up and down the difficult turning staircase:  removing the playfield.
After trying and failing to arrange for 3 people to help get Apollo 13 up the stairs (it is a very heavy game even with the head off!) I decided to see what it'd take to get the playfield out.
This was inspired by Rollergames, where we quickly realized that once you disconnect the head, the playfield is already disconnected and easily lifts out.
On A13, there were just 3 additional connectors to label and detach.  I can only see this being an issue on 90s Williams machines, where they have the brackets+sliders that also secure the playfield in.


So with the playfield removed, A13 was able to come up with just the two of us:  playfield, body, head.
The owner came and grabbed it, leaving Stars in the garage, which I got down a few days later another day.


First thing I noticed about Stars is that I hate these ridiculously thin and fragile board connectors. 

This game also has the back left leg plate busted, and so the leg only attaches there with bolts on the inside. I am NOT the person to work on this cab and get the plate back.  Perhaps the next owner will take a stab at that.


The playfield is super dirty, but the plastics were in great shape.  Only the left sling was warped, but I can fix that in the oven. 
Backglass is in good shape, and seems to already be sealed with triple thick.

yeah that might need some fixin

that's gonna need some fixin

warped plastics? that's a fixin

seized solenoid in the school's canoe?  you best believe that's a fixin


Lots of lights out on the playfield.
Needs all new rubbers.
4th player display is non-working. 
Casters are seized in to the legs, making levelling nigh impossible.


Let's fix some pinball!


Mr. Gorbachev:  TEAR DOWN THOSE RUBBERS

cleaned plastics!

Rollergames progress

The upper flipper is where all of the points are, so if that's out of whack, the game is wack.
I saw "magnet grab" pushed the ball down in to the flipper, demonstrating that it was too far out.  I adjusted the flipper position, and it made the shot SO MUCH better.
But then when the ball came from the popper, it was having trouble getting stopped by the magnet.  I had overcompensated:  Now there was no friction of the flipper and the ball sailed past.  After a second adjustment, both the grabs and shots seem to be on point.

too much!

too little!


The big thing to work on was the wonky display issue.  Thanks to this pinside thread, we got the problem solved.


Tracing back in the schematics, we can see that those characters come from the main CPU board, specifically SRC2.
I took a moment to inspect the component on the board, didn't see much.  But then I bent it upwards and WOAH there was our obvious issue:  the bolt on the battery holder must have rubbed that component when it was installed.

UHHHHHHHHH NOPE


But that's just one part of a larger issue:  there had obviously been a battery issue in the past as there was corrosion on the board in the general area.  I am told any contacts that are tarnished do not shine are most likely corrosion.
Someone dealt with a bad battery and battery holder, and did a bit of a hack fix with the bolt on the battery holder, leaving corrosion on the board, and damaging SRC2 in the process.

segment g and comma are always on

here we see g and 'com' are next to each other, pins 25 and 26 of the data cable, which I inspect for damage but find none.  (CLICK TO EMBIGGEN)


trace back to MPU board we see that 'g' and 'com' are pins 8 and 9 of that same SRC2


So here's the thing with these "SIP Packs" as they are referred to:  they are banks of resistors, with a small capacitor to assist in filtering.  They are also unobtainium.
Someone has made exact replacements, but they are ridiculously pricey.  (search for R/C Module)
You can get by with just using a 40 cent SIP pack that is just resistors, which is what we did.  A pinsider kindly sent some my way, we clipped the 10th leg on it (only 9 holes, and this is fine as long as you align the dots,) and now the display is working just fine!

But if you read the bottom of the pinside post, this board might be unseavable in the long run.

Tutorial: getting all the bulbs working

My friend Lee (cdnpinballer) had posted up this great tutorial last year that I wanted to share.
When you get a new game in the shop, how do you get all of the bulbs working?

His response, in regards to his Big Game:

I always start diagnosing non working lamps by trying a fresh new bulb with a few turns of the socket and in my case I had to replace probably 10 burnt out bulbs. If the new bulb doesn't work I then reach for my aligator clips. 

I clip one end to the questional lamp socket and the other end to a working lamp socket. If the lamp turns on then I know the socket and bulb are good. If it doesn't turn on then I know to replace the lamp socket. So, I had to replace a few lamp sockets as well. 

Then I turn to the connector pins on the lamp driver board. I just replace the 0.100" connector pins of the suspect bulbs because it takes a minute or two and it's easy. So, that fixed maybe 2 or 3 broken bulbs. At that point I was left with 4 non working bulbs. 

The only items left in the chain are the transistors, chips, some resistors and possibly broken solder joints on header pins or the header pins themselves. So, I removed the lamp driver board for a closer look. 

Solder looked good, no cold joints. Header pins looked OK. Tested the suspect transistors and 2 of the 4 definately tested bad so changed those along with the other 2 suspects because it doesn't take that long to do and they are cheap. 

With the board reinstalled 2 of the lamps still didn't work in attract mode. WTF? Do I need to replace a chip now? It doesn't make sense because they're driven by different chips. Hummm.. I was stumped until I put thr game into test and everything started flashing. Lesson learned! Not all lamps flash in attract mode! :FP: